
A PDF that looks good isn’t always a PDF that works. As digital accessibility standards evolve, most notably the latest ADA Title II updated requirements, the “print to PDF” shortcut is becoming a thing of the past. Why? Because “printing” strips away the vital “tags” that tell assistive technology what is, for example, a heading and what is just big, bold text.
This month, we’re diving into the Google Doc-to-PDF pipeline. We’re moving away from static, inaccessible snapshots and toward structured, tagged documents that prioritize navigation and accessibility.
- Start with strategy: Does this need to be a PDF?
- Prepping your Google Doc
- Exporting to PDF
- Checking your work
- Key takeaways
Start with strategy: Does this need to be a PDF?
Before you hit “Export,” ask if a PDF is the right tool for the job. Often, the most accessible PDF is the one that stays a webpage or a live document.
- The web-first choice (HTML): If your content is mostly text and needs frequent updates, make it a webpage. HTML is natively responsive, mobile-friendly, and much easier for screen readers to navigate than a PDF.
- The collaborative choice (Google Docs): If you’re working internally, keep it in Google Docs. It’s reflowable, meaning the text adjusts to fit the user’s screen size.
- Reader benefits: Teammates using assistive technology can toggle Accessibility Mode (under the Tools menu) to improve how their screen reader interacts with the doc.
- Author basics: To make this work, you must still apply accessibility fundamentals like Heading Styles (H1, H2, etc.) and Alt text for images.
- Sharing tip: You can share a Google Doc with “View Only” permission to keep it as a live, accessible resource without allowing edits.
- The fixed layout choice (PDF): Use a PDF only when you truly need a “locked” layout, specifically for legal signatures, professional printing, or offline distribution.
Still not sure which to choose? Check out our deep dive: Inaccessible PDFs? How to know when to use HTML webpages instead of PDFs.
Prepping your Google Doc
An accessible PDF starts with an accessible source. If your Google Doc is made with accessibility practices in mind, it’ll work better when exporting.
- Use heading styles: Don’t just make text big and bold. Use the Styles dropdown (H1, H2, H3) to create a navigable map for screen readers.
- Use alt text: When adding alt text, always use the Description box. Many screen readers ignore the “Title” field.
- Write meaningful links: Use descriptive text like “2026 Budget Report” instead of “Click Here” or raw URLs.
- Simplify tables: Use tables for data, never for layout. Avoid merged or split cells because they can break reading order.
- Color contrast: Check that your images, icons, and fonts meet color contrast recommendations.
Pro-Tip: Accessibility Mode (found in the Tools menu) is a setting for the reader using assistive technology. It is not an automated accessibility checker for the author.
For a deep dive into these accessibility steps, check out our full guide on linking to a Google Doc.
Exporting to PDF
The “Hard No:” Do not “Print to PDF”
Before we look at how to do it right, we have to talk about the most common mistake: using the browser’s “Print” menu to save a PDF.
- The problem: Printing essentially “flattens” your document into an image.
- The failure point: It strips away every single tag, link, and piece of alt text you worked so hard on. To a screen reader, a printed PDF is a blank page. We recommend using an “Export” or “Save As” function instead.
Method 1: The Grackle Docs way
Grackle is a Google Workspace add-on specifically designed to bridge the accessibility gap between Google and PDF. It is currently one of the more robust ways to ensure a successful tagged export.
How to do it:
- Download the Grackle Doc extension
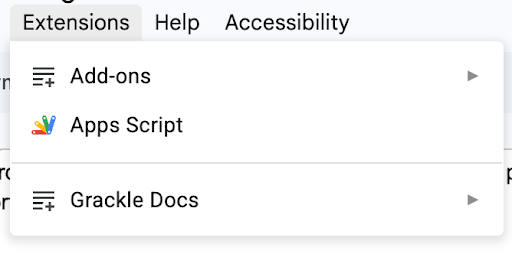
- Launch the Grackle Docs add-on from the Extensions menu.
- Review the automated accessibility check that appears in the sidebar.
- Address any flagged issues within the Grackle interface.
- Select “Export to PDF” from the Grackle sidebar
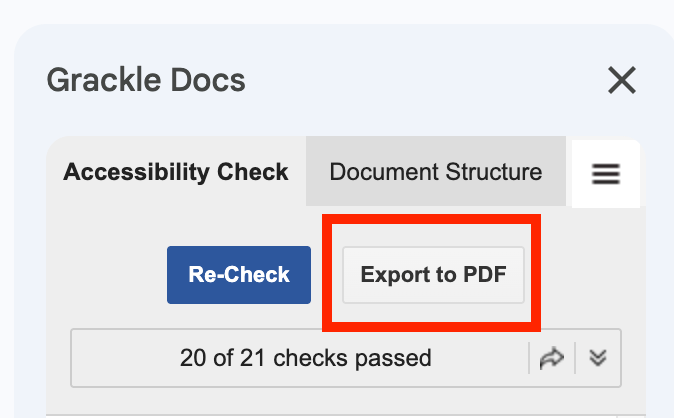
- Open the file in a PDF viewer to check accessibility
Method 2: The native Google export
If you don’t have access to third-party add-ons, Google’s built-in export has improved significantly. You do not have the extra functionality that Grackle Docs offers, like being able to set table headers, but it can still work to give you an effective PDF.
How to do it:
- Navigate to File > Download.
- Select PDF Document (.pdf).
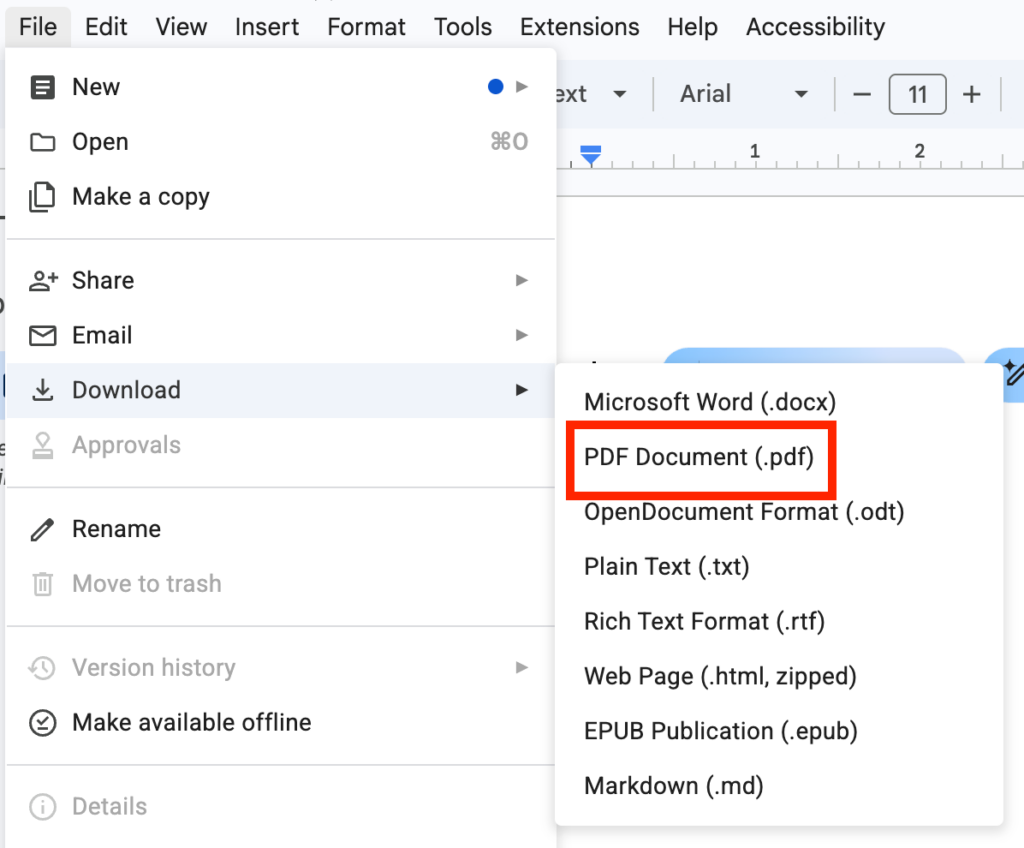
- Open the file in a PDF viewer to check accessibility.
The pro move:
For the best results with this method, keep your document to a single-column layout. The simpler the visual structure, the more likely Google’s native engine will tag it correctly.
Method 3: The Microsoft Word “handshake”
If you have access to Microsoft Word, this “middle-man” method is a reliable workaround.
How to do it:
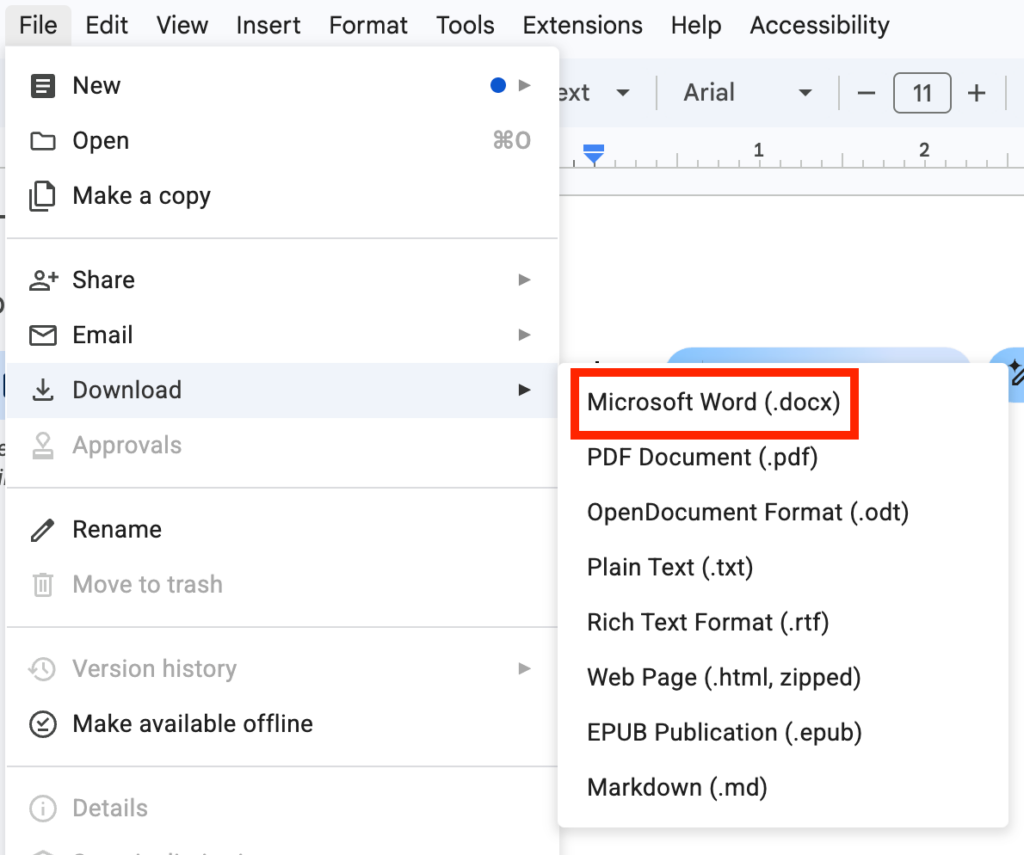
- In Google Docs, go to File > Download > Microsoft Word (.docx).
- Open the file in Word and do a quick visual scan of the document to verify there were no formatting shifts between the Google doc and Word export.
- Run the Accessibility Checker (Review > Check Accessibility) and review the results.

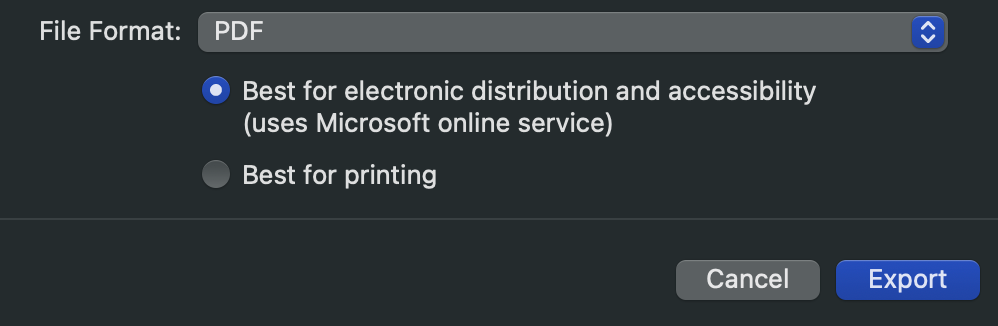
- Go to File > Save As and choose PDF.
- Click Options and ensure “Best for electronic distribution and accessibility” is checked. This prevents the export from removing the vital tags.
- Open the file in a PDF viewer to check accessibility.
The pro move:
If you have the Adobe Acrobat add-on for Word, use the “Create PDF” button instead of “Save As.” It uses the most sophisticated tagging engine available and usually produces the cleanest results. See this article from WebAIM for more information on this process.
Checking your work
Even with a high-quality export, document accessibility still requires a human to verify it worked. In this section, we’ll talk about using Adobe Acrobat Pro as your primary environment for these final checks. While automated tools are excellent for catching technical errors, they can’t always account for the nuances of the human experience.
The Reading Order Tool
Located within Acrobat’s toolbars, this tool provides a visual overlay of numbered boxes representing the path a screen reader will take through the page. It’s your primary way to verify that the logical flow of the document matches the visual layout. To see a demo on why reading order matters, see our video on the user impact of inaccessible PDFs.
The Accessibility Checker
This automated scan audits the “invisible” metadata and technical structure hidden within the file’s data. It ensures the document meets baseline techncial standards for accessibility.
The screen reader test
Using a screen reader like NVDA (Windows) or VoiceOver (Mac) is the only way to truly hear what your user hears. It allows you to step into their shoes and verify the pacing and clarity of your content.
PDF export accessibility checklist
Exporting is often a mysterious process where elements can shift or break unexpectedly. Regardless of which method you used, use this checklist to verify your final PDF:
- Reading order & layout: Using the Reading Order tool, make sure the reading order of your document follows a logical path (usually top-to-bottom, left-to-right). Check that sidebars or multi-column layouts didn’t jumble the text sequence.
- Images & alt text: Verify that images appear in the correct spot in the reading order. If the image is missing its numbered box in the Reading Order tool, the alt text likely didn’t export. (Hint: Set images to “inline with text” in your Google Doc before exporting for the best results).
- Lists & hierarchy: Verify that lists are recognized as a single unit. If items are broken into disconnected boxes, a screen reader won’t announce the list size. Ensure sub-bullets are still nested under their parent items.
- Table metadata: Confirm that your table headers (rows and columns) transferred as tags and are recognized by the checker.
- Interactive elements & metadata: Check that hyperlinks are still clickable and that the Document Title and Primary Language settings remained intact during the export.
Need a technical deep dive? For a step-by-step walkthrough on how to navigate Adobe Acrobat’s accessibility menus and resolve specific errors, see our comprehensive guide: How to check and fix PDF accessibility issues.
Key Takeaways
Mastering the Google Doc-to-PDF pipeline doesn’t have to be complicated. If you remember nothing else from this guide, keep these four rules in mind for your next project:
- Consider if it should be a PDF: Before hitting “Export,” ask if a PDF is the right tool for the job. HTML webpages are natively responsive and often easier for screen readers to navigate, so reserve PDFs for “locked” layouts like legal signatures or professional printing.
- Structure is strategy: An accessible PDF isn’t made at the export stage; it’s built in the Google Doc using strategies like headings and alt text.
- Export over print: Never use the “Print” menu to export a PDF. Use “Download as PDF” or a specialized tool like Grackle to keep your tags.
- Check your work: Always run a final check in Acrobat or another accessibility checker, and do a screen reader test to verify your PDF works as it should.