
PDFs can be a large part of an organization’s digital content. They must be accessible so users with disabilities can access the content without barriers and frustration.
To check and fix PDF accessibility issues, you’ll need certain knowledge and tools. A common software is Adobe Acrobat Pro, which has all the tools needed to make a PDF accessible.
In this article, we’ll review the tools and steps you can take with Adobe Acrobat Pro to check and fix PDF accessibility issues.
- What makes a PDF accessible
- Before fixing the PDF, decide if it should stay a PDF
- PDF accessibility tools in Adobe Acrobat Pro
- Steps to review and fix PDF accessibility issues
- Review and fix a PDF example
What makes a PDF accessible
An accessible PDF includes many of the same accessibility strategies a website needs. For example, color contrast, alternative text on images, heading structure, accessible tables, and descriptive links. On websites, a lot of the accessibility happens in the HTML. For PDFs, the accessibility happens in the PDF’s tags, which can be thought of as the HTML, or structure, of the PDF document.
The default view of a PDF is the visual layer. This is what visual users see on the screen. When it comes to an accessible PDF, we also need to consider the tag layer, or the structure of the PDF.
The tag layer includes the PDF’s content and structure. Screen readers use those tags and their order to announce the PDF’s content correctly.
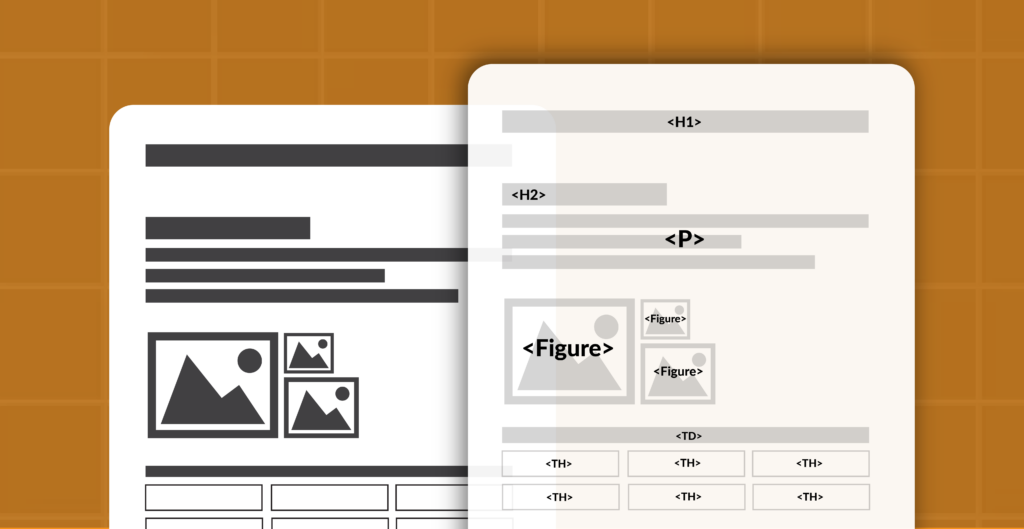
So, an accessible PDF needs to be properly tagged, and those tags need to be in the correct reading order.
The rest of the article focuses on tools and steps for checking PDF accessibility including tags and their reading order.
Before fixing the PDF, decide if it should stay a PDF
One of the most common errors with PDFs is making content into a PDF that should be an HTML webpage. Most of the time an HTML webpage is a better option than a PDF because HTML webpages have several benefits:
- Easier to make accessible
- Mobile-friendly
- Keeps the website navigation and context
- Search engine friendly
- Less load time
- Easier to update and keep updated
For more information on whether it should be a PDF or not, review Inaccessible PDFs? How to know when to use HTML webpages instead of PDFs.
PDF accessibility tools in Adobe Acrobat Pro
A common software used for PDFs is Adobe Acrobat. There is Adobe Acrobat Reader, which users can use to read PDFs. There is also Adobe Acrobat Pro, which is the only version of Acrobat with the accessibility tools needed to check and fix accessibility issues.
Adobe Acrobat Pro has three accessibility tools we’ll review and use in our steps to check and fix PDF accessibility issues. We’ll start with how to access and use each.
Fix reading order tool
The Fix reading order tool is the easiest way to edit and add tags to your PDF. It’s where you’ll spend most of your time reviewing and editing tags and reading order.
Rather watch the video? Watch How to use Adobe Acrobat’s Fix reading order tool.
Open the Fix reading order tool
To access the Fix reading order tool:
- Select All Tools in the top left.
- Select Prepare for accessibility.
- Select Fix reading order.
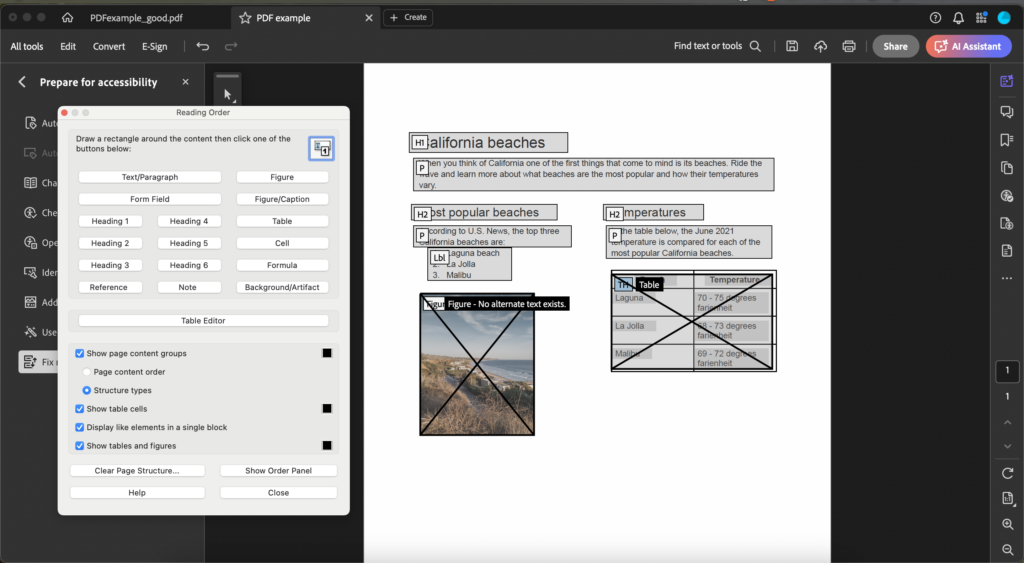
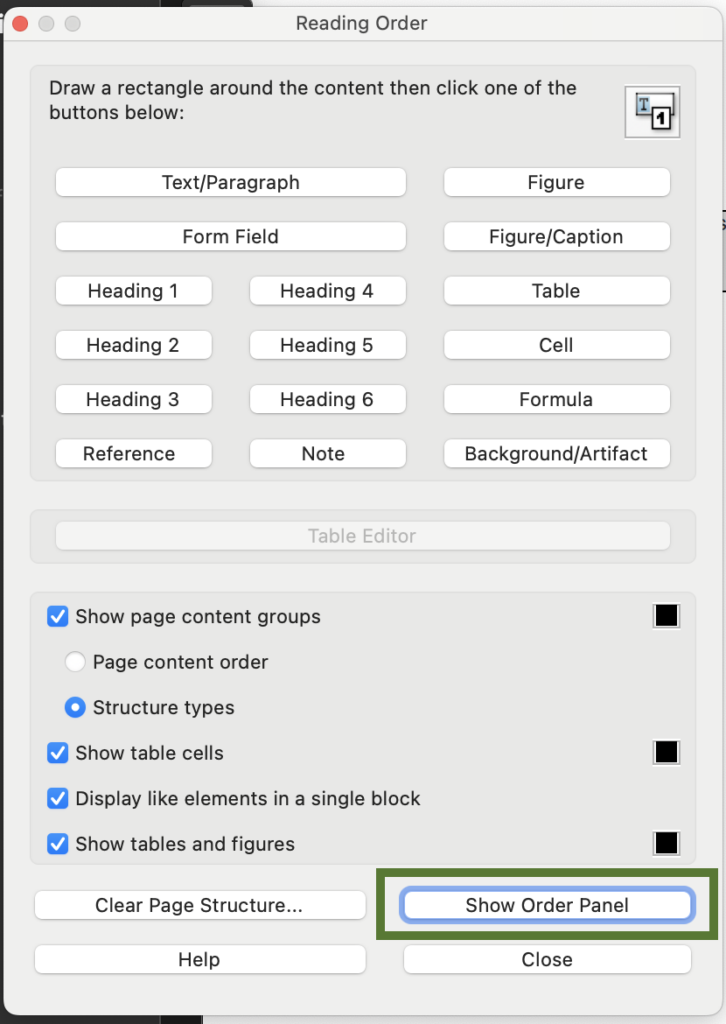
- In the Reading Order dialogue box that opens, make sure Show page content groups is selected.
- Under Show page content groups, select Structure types.
Now, the Reading Order dialogue box is open and your content is chunked by tags. The content with that tag is in a gray box with its tag in the top left of the gray box.
Edit PDF tags using the Fix reading order tool
To edit a tag:
- Select the tag in the left of the gray content box.
- Select the tag it should be in the Reading Order dialogue box.
Delete and add new tags using the Fix reading order tool
If the content blocks in your PDF are wrong, you can delete them and make new tags with the correct content.
To delete and add a tag:
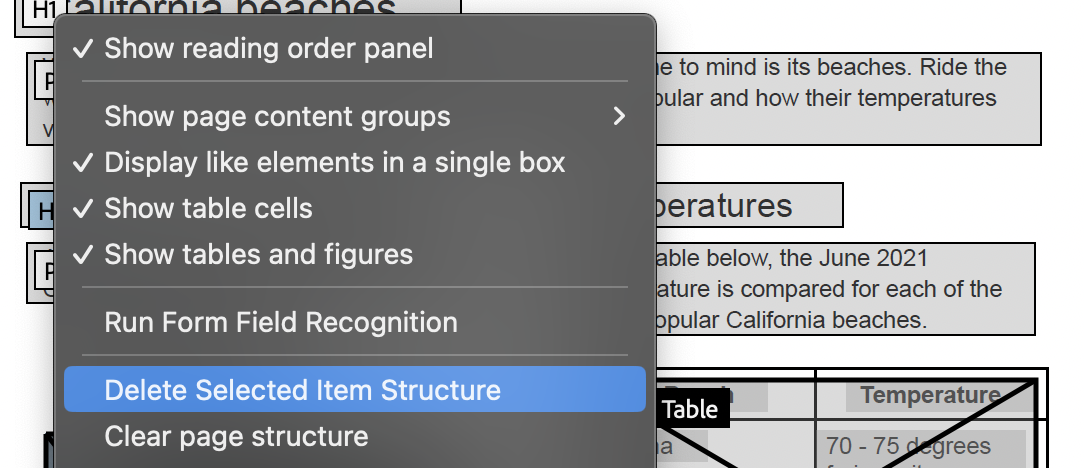
- Select the tag in the left of the gray content box.
- Right-click the tag.
- Select Delete selected item structure.
- When the Reading Order dialogue box is open, you can select and drag your cursor to select the content that should be in the content block. That content will have pink boxes around it after selecting it.
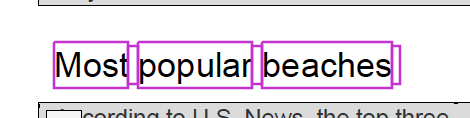
- Once the content is selected, select the tag it should be in the Reading Order dialogue box to add the new tag to it.
Check reading order
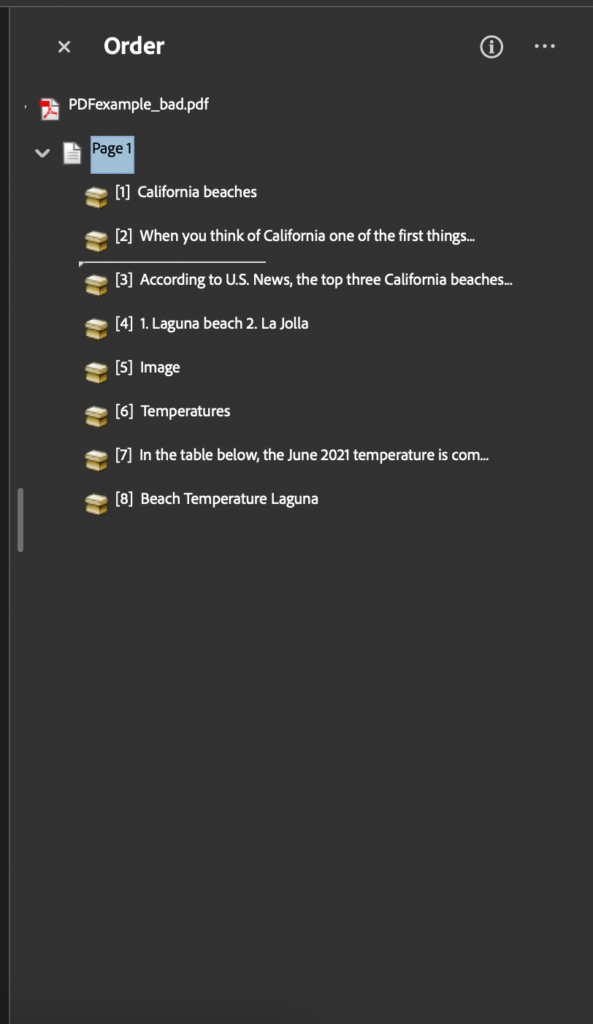
At the bottom of the Reading Order dialogue box, there’s the Show Order Panel button. This opens the Order pane. The order of the content in this pane is how screen readers will announce the content. Drag and drop elements to adjust the order.
Edit table tags
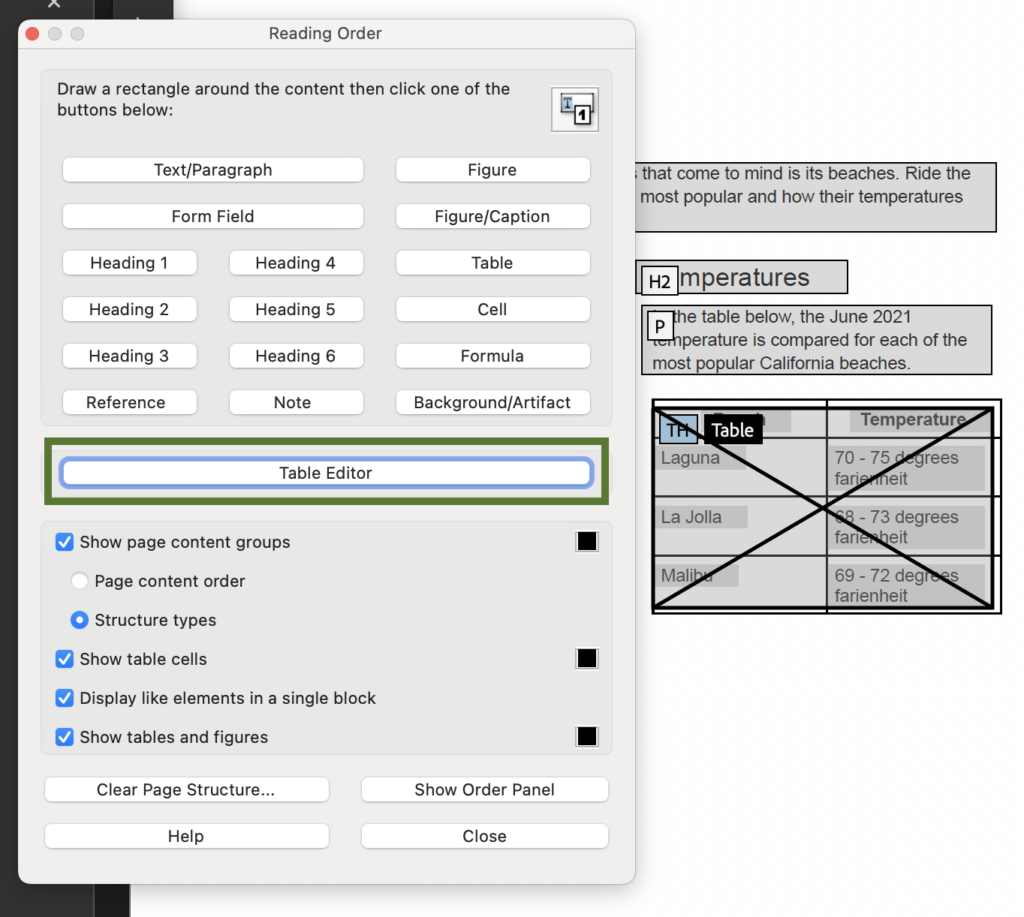
The last part of the Reading Order dialogue box is the Table Editor. Tables need tags that say which cells are the headers and if it’s a column or row header and which cells are data cells. The Table Editor helps you check and add these tags.
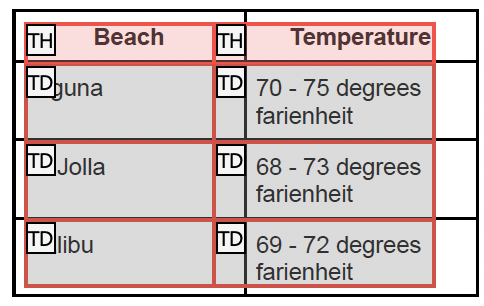
To use it, select your table. Then, select Table Editor in the Reading Order dialogue box. Now the table has more detailed tags. Header table cells have a TH tag with a red background and data table cells have a TD with a gray background.
If your table doesn’t have headers or needs tag adjustments, you can edit it in the Table Editor.
To edit your table tags in the table editor:
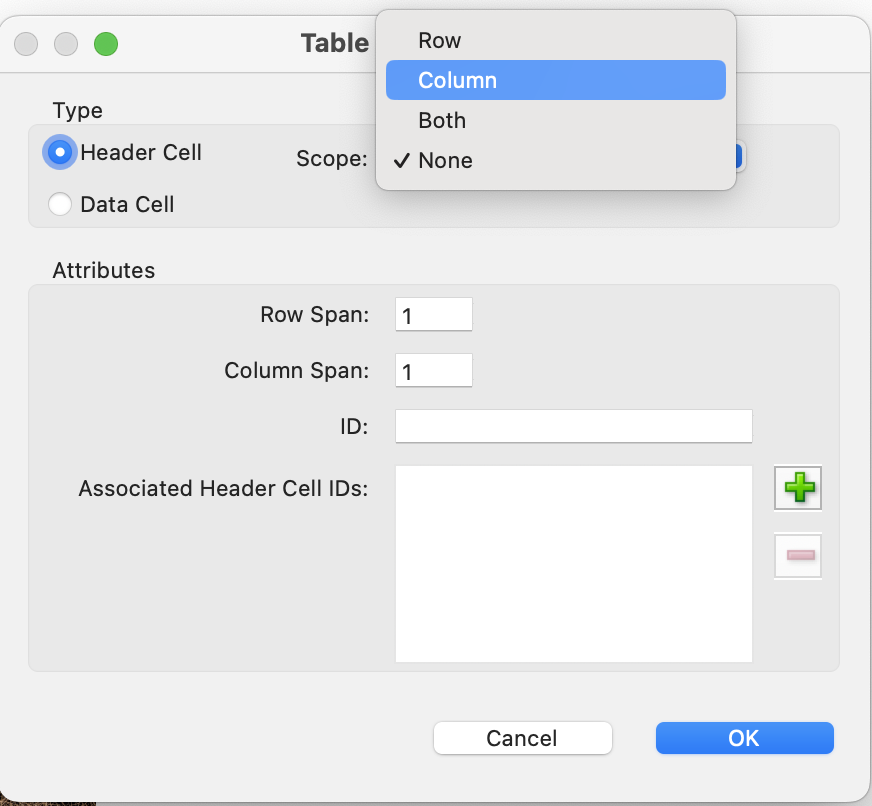
- Right-click on the cell that you want to edit.
- Select Table Cell Properties.
- If it’s a header cell, select Header Cell. Then from the Scope dropdown, select if it’s a column or row header. If it’s a data cell, select Data Cell.
- If the cell spans multiple row or column cells, update the Row or Column span fields.
- Select OK.
Your table tags will update so you can see if these adjustments fixed your table.
Accessibility Checker
Adobe Acrobat Pro’s Accessibility Checker checks your PDF for several accessibility issues like document language, document title, alternate text, tables, list formatting, and heading structure. It can act as your guide to help you fix and review your PDF’s accessibility.
Rather watch the video? Watch Remediate a PDF for accessibility using Adobe’s Accessibility Checker.
IMPORTANT: The Accessibility Checker automatically checks accessibility issues including if the document is tagged. You should still manually check your tags and document’s reading order using the Fix reading order tool. The Accessibility Checker doesn’t know if your tags are correct – it just knows they’re there.
Run Adobe Acrobat’s Accessibility Checker
To run the Accessibility Checker:
- Select All Tools in the top left.
- Select Prepare for accessibility.
- Select Check for accessibility.
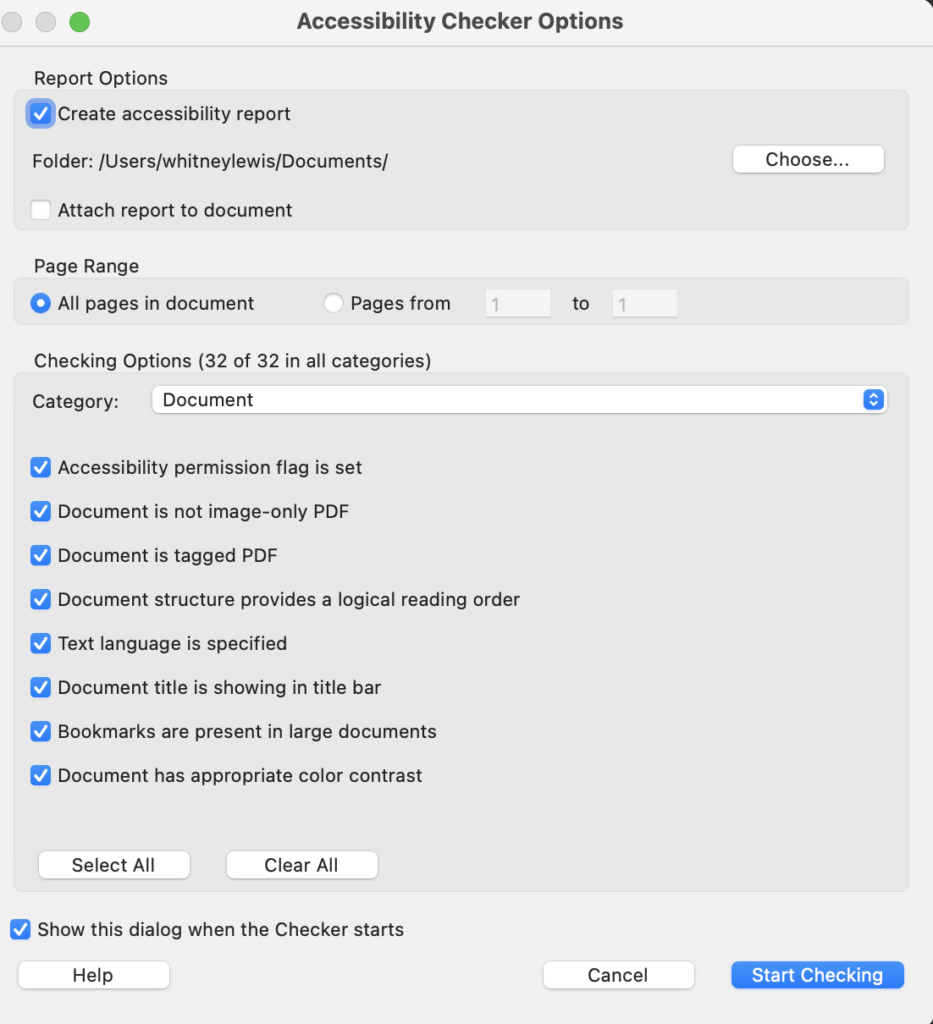
- Under Checking Options, make sure everything is selected.
- Select Start Checking.
The results are shown in the Accessibility Checker pane on the left.
Reviewing Accessibility Checker Results
The Accessibility Checker has seven result sections:
- Document
- Page content
- Forms
- Alternative text
- Tables
- Lists
- Headings
Each section has results that either pass, fail, or need a manual check.
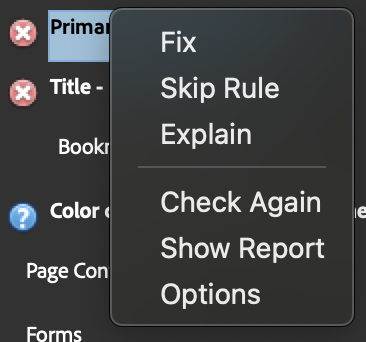
Right-click any result to:
- Fix: This appears for some failed results. Select Fix for Adobe to either automatically fix the result or open the dialogue box for you to fix it.
- Skip Rule: If the rule doesn’t apply to your content, you can select Skip Rule to dismiss it. Most results will apply to your content so make sure you understand how it would effect your document’s accessibility.
- Explain: This opens Adobe’s documentation on this result. Their documentation helps you understand the result and how to manually review and fix it if needed.
- Check Again: This rechecks the result to confirm it’s resolved.
- Show Report: This shows the Accessibility Report.
- Change Options: This opens the Accessibility Checker Options dialogue box.
Accessibility Tags panel
The last accessibility tool in Adobe Acrobat Pro is the Accessibility Tags panel. The Accessibility Tags panel shows all the tags in the document in logical order. It also has container elements that group content together. For example, a Part or Sect container element that chunks together the content.
IMPORTANT: You’ll review and fix most tag and reading order issues with the Fix reading order tool. You only need to use the Accessibility Tags panel to adjust List tags. The Review and fix example below demos how to use the Accessibility Tags panel to fix a List structure issue.
Open the Accessibility Tags panel
To access the Accessibility Tags panel:
- Select the hamburger Menu (Windows), or the View menu (macOS).
- Select Show/Hide > Navigation Panels > Tags.
- Expand the tags to view the document’s tag structure.
This opens the Accessibility Tags panel and adds it to your side panels menu on the left.
For more information on the Accessibility Tags panel, review Adobe’s Edit document structure with the Content and Tags panels (Acrobat Pro).
Steps to review and fix PDF accessibility issues
Now that you’re familiar with Adobe Acrobat Pro’s tools for finding and fixing accessibility issues, let’s review the steps to take whenever you link to a PDF.
- Manually review tags. Use the Fix reading order tool to make sure each tag is correct and the content is chunked correctly.
- Manually review the reading order. Use the Fix reading order > Show order panel tool to make sure it’s announced by a screen reader in the right order.
- If your document has tables, review the table’s structure. Use the Fix reading order > Table editor tool to ensure the table has headers defined as either column or row headers.
- Run the Accessibility Checker. Fix any failed results and review results that need manual review.
Once you’ve reviewed your PDF, you can use a free screen reader to do a final check. Testing with a screen reader can confirm your tags are announced correctly and that tables and lists are formatted correctly.
Learn how to test a PDF with a free screen reader in one of these videos:
- Windows: Testing a PDF’s accessibility with NVDA basics
- Mac: Testing a PDF’s accessibility with Mac’s VoiceOver basics
The PDF has several tag issues
If your PDF has several tag issues, go back to your source document, add the proper formatting, and export it as a PDF. If you don’t have a source doc, try converting your PDF to a Word doc.
Some source documents keep tags better than others. For example, exporting a Word doc as a PDF should keep tags well.
Review and fix a PDF example
Let’s review and fix a real PDF using the tools and steps above. If you want to follow along with these steps, download the example PDF with issues.
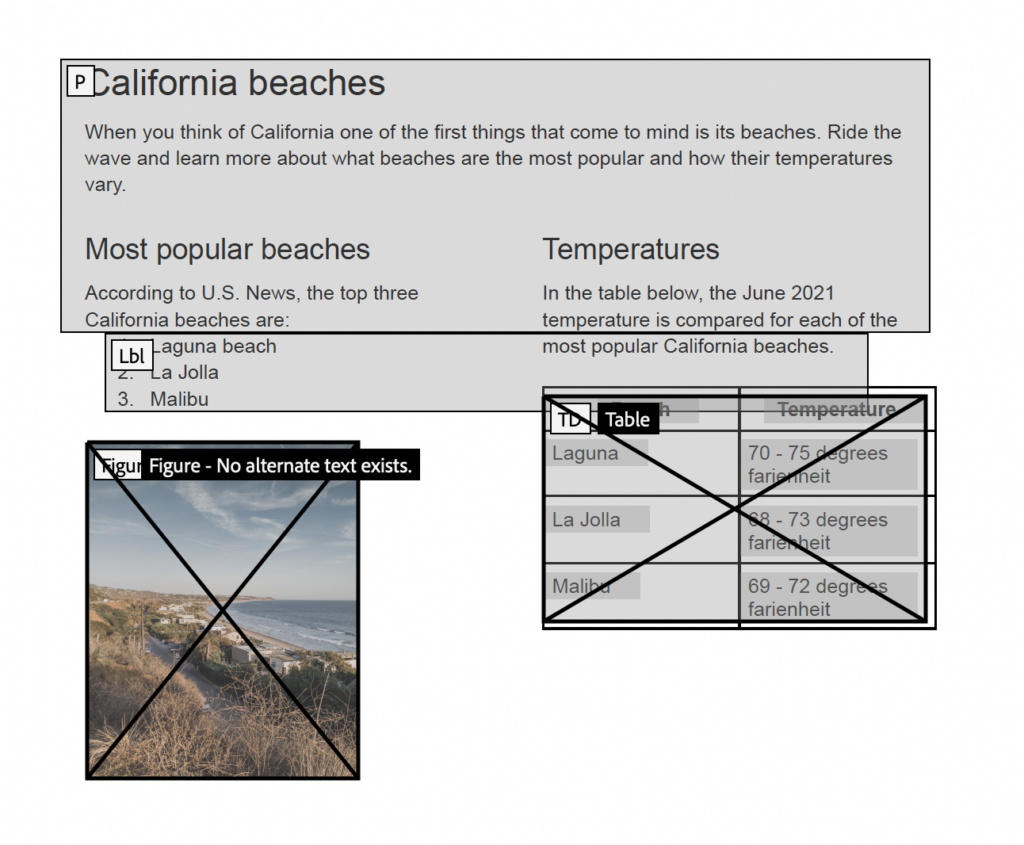
The PDF has headings, columns, a list, an image, and a table.

Manually review tags
I’ll start by reviewing the tags and content chunks with the Fix reading order tool.
There are several issues I need to fix.
First I notice the heading 1, first paragraph, heading 2s, and the text beneath them are chunked as one paragraph content block. To fix these, I’ll delete the paragraph tag and then add the appropriate tags for my headings and paragraph text.
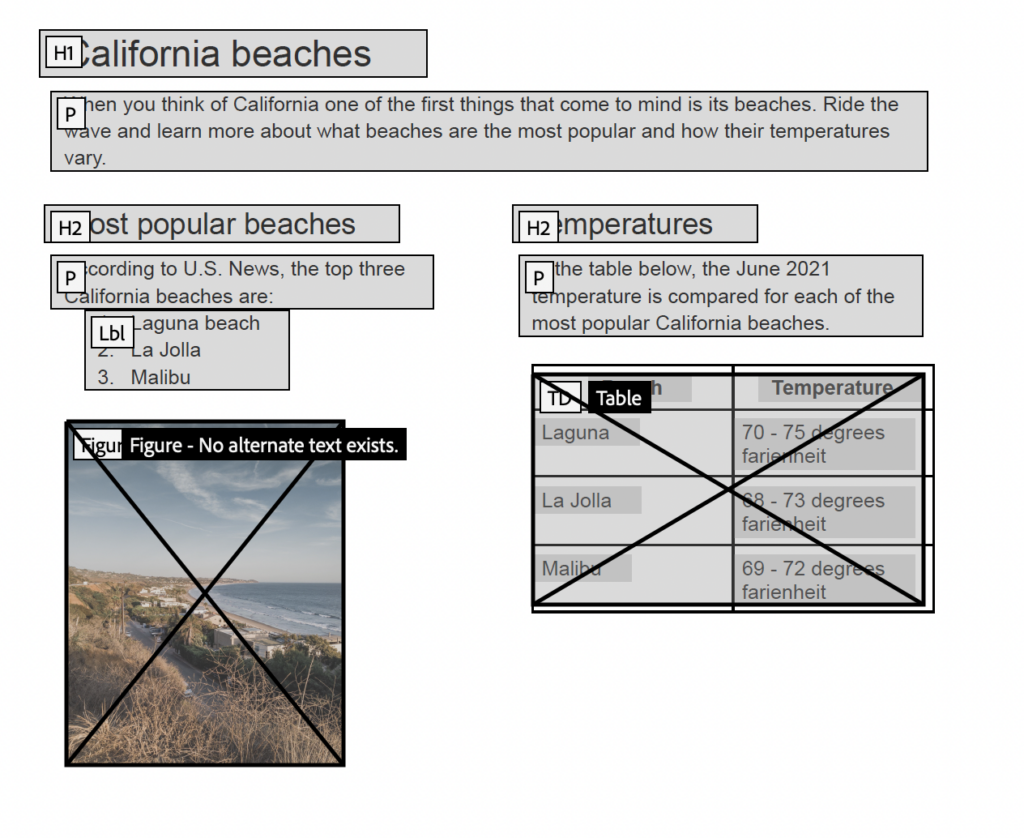
Now, my heading 1, paragraph text, heading 2s, and their paragraph text all have the appropriate tag and are chunked correctly.
At this point, I won’t do anything with the list, image, or table. They have the right tags – I’ll review them in more detail later.
Manually review the reading order
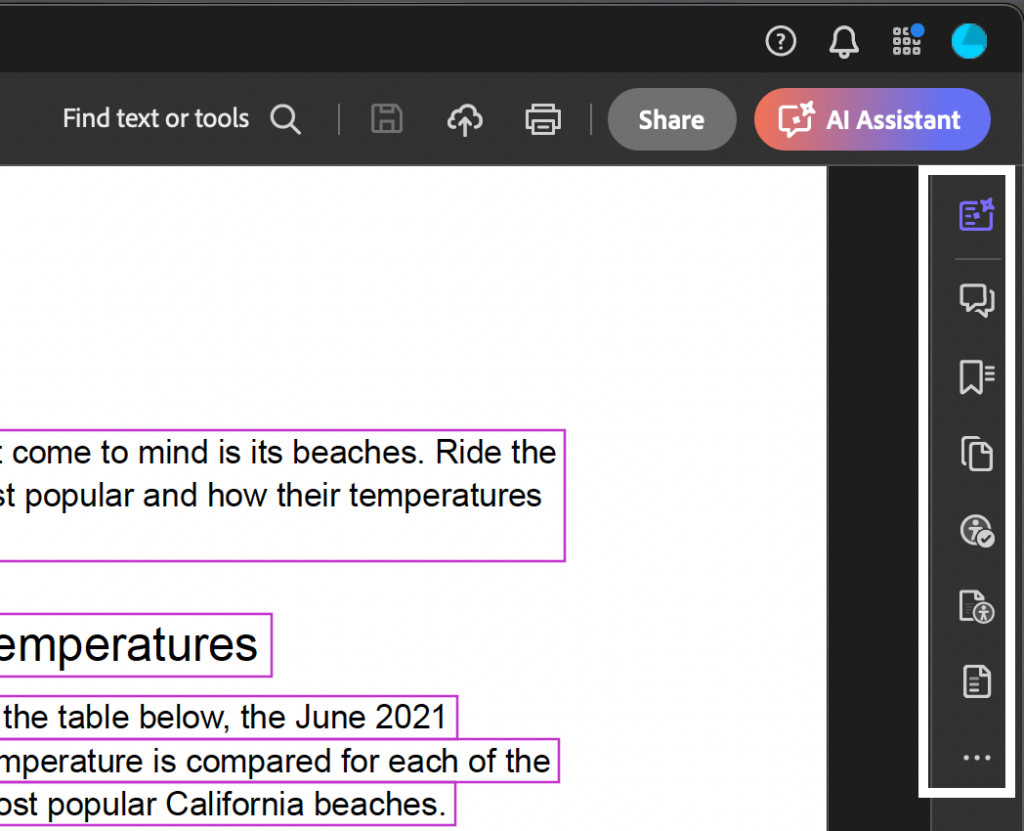
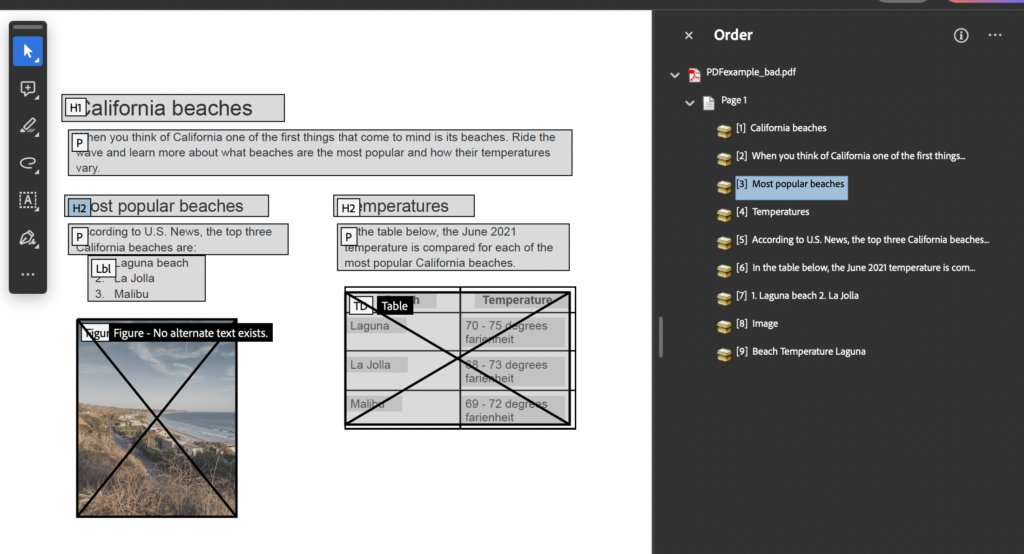
Next, I’ll review the reading order using the Fix reading order > Show order panel tool.
This PDF has columns, so the reading order should go down the first column and then to the next.
Right now, the reading order goes from heading 2 to the next heading 2, so it’s going across the two columns instead of down one column. To fix this, I’ll drag and drop the tags in the Order panel to the right order.
Review the table’s structure
My PDF does have a table, so I’ll use the Fix reading order > Table editor tool to review it.
Every cell in my table has a TD, or table data cell.
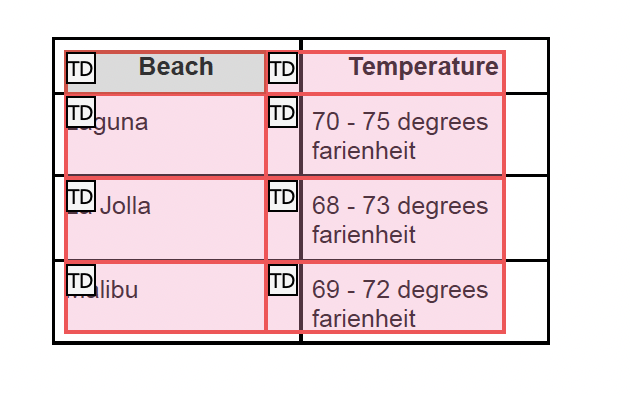
To fix this, I’ll right-click the header cells and change them to headers with a column scope.

Run the Accessibility Checker
I’ve manually reviewed the tags, reading order, and table. Now, I’ll Run the Accessibility Checker. I’ll go through each of the seven sections in the Accessibility Checker.
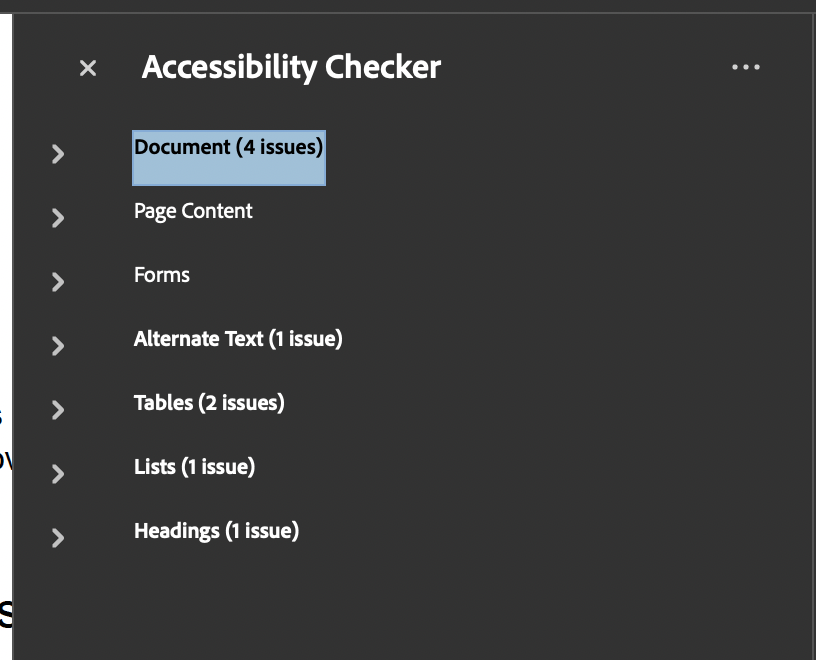
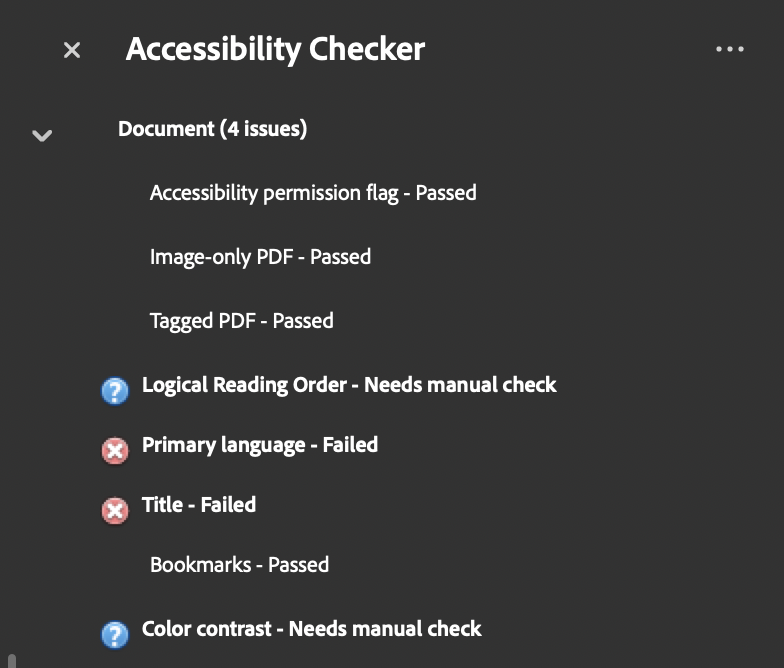
Document
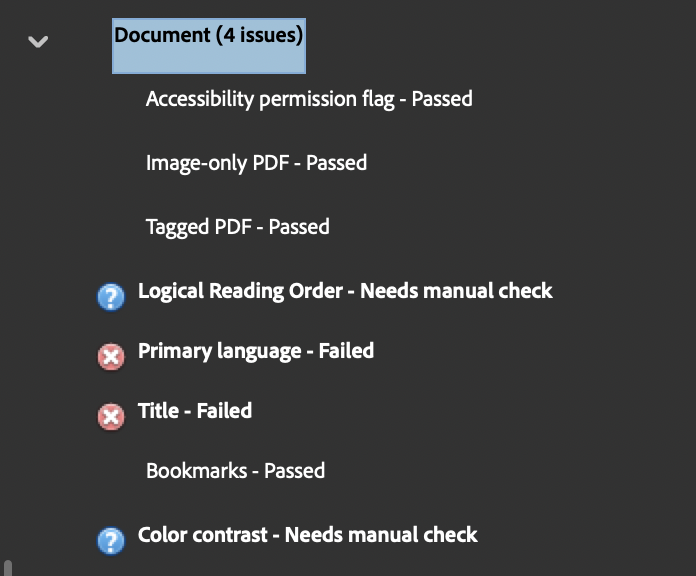
I had four issues with Document:
- Logical Reading Order: Logical reading order needs a manual check. I already did this with my Fix reading order tool, so I can right-click and select Pass.
- Primary language: I’ll right-click and select Fix. Then, I can choose the document language.
- Title: I’ll right-click and select Fix. Adobe automatically adds a title based on the filename. To manually fix it, I’d select Explain for more information.
- Color contrast: Color contrast needs a manual check. This document doesn’t have any color contrast issues, so can right-click and select Pass.
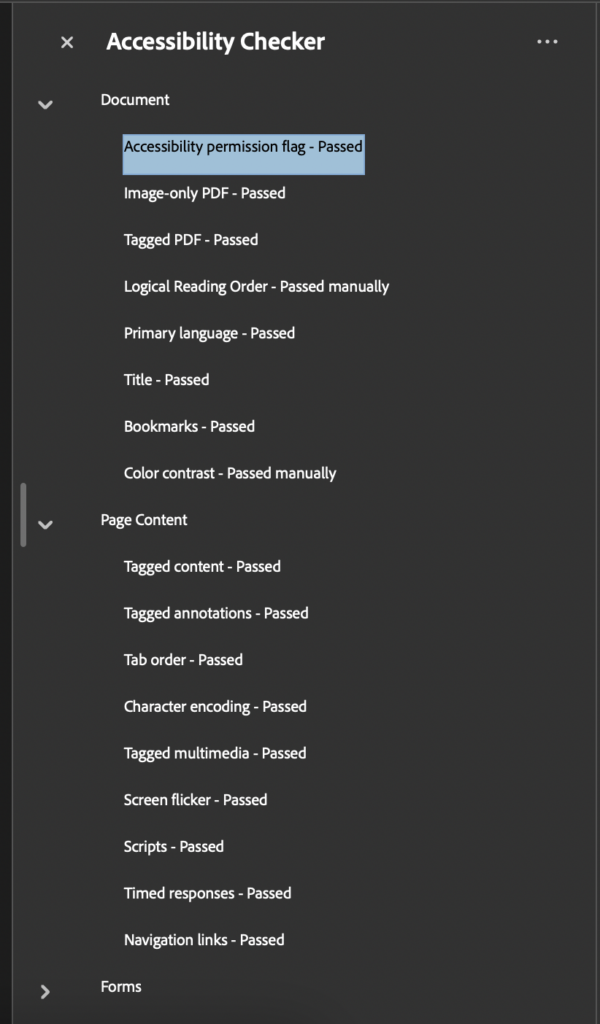
Page content
This PDF passed all the Page content results. That said, I manually checked my content’s tags, so I know the document is tagged and that the tags and content chunks are correct. The Accessibility Checker doesn’t know if the tags and content chunks are correct, so it’s important I did that.
Forms
This PDF doesn’t have form fields, so there weren’t any issues.
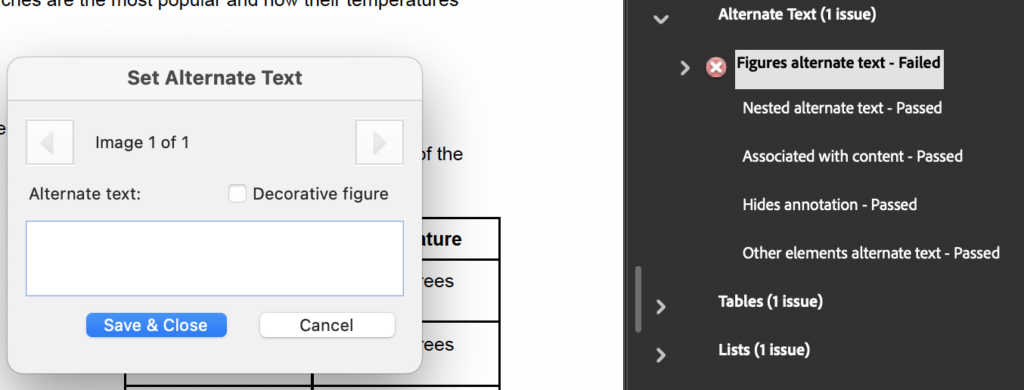
Alternate text
I had one issue under Alternate text – there’s an image that doesn’t have alternate text. To fix this, I’ll right-click, select Fix, and Adobe opens a dialogue box to add the alternate text or define it as a decorative figure.
Tables
The issue under Tables is I don’t have a table summary. Table summaries are optional, but can be important because screen readers announce them before announcing the table’s data.
The paragraph above my table summarizes the table already, so the table doesn’t need an additional summary. I’ll right-click and select Skip rule.
Lists
There’s one issue under Lists. The list items in my list failed. To understand what this means, I’ll right-click and select Explain. I learned this result checks “whether each List Item (LI) is a child of List (L).”
I need to use the Accessibility Tags panel to fix the list structure.
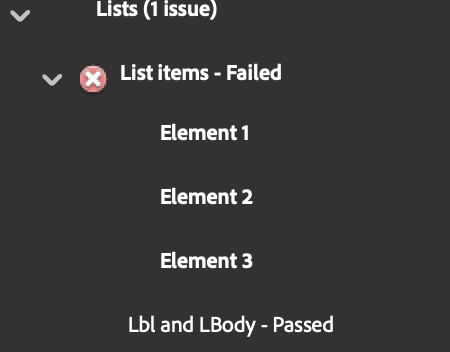
With the List items caret open, I can right-click the element and select Show in Tags panel.
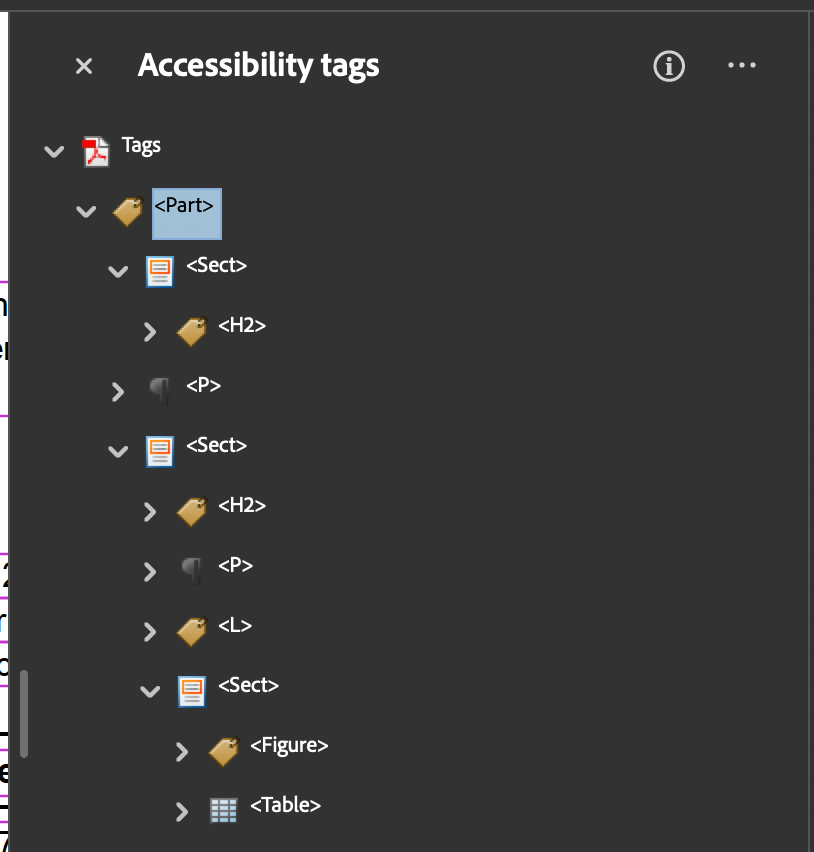
In the Tags panel, I select the list-related tags. As I select them, there’s a pink border around the element in the PDF. This helps me understand the structure of the list.
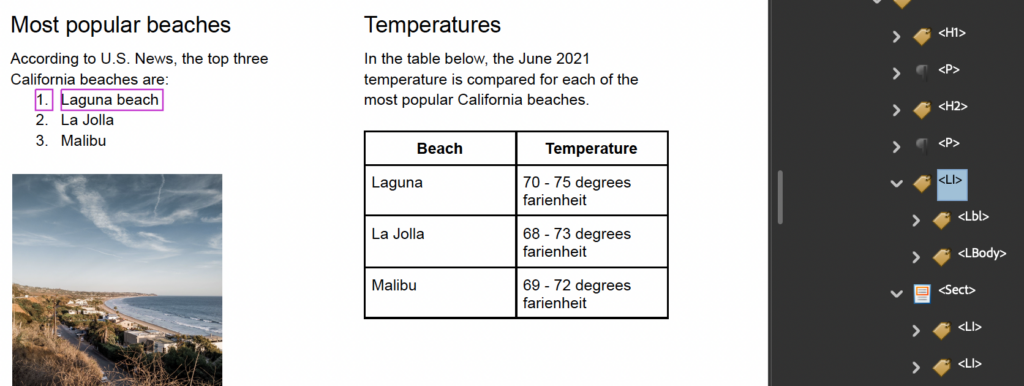
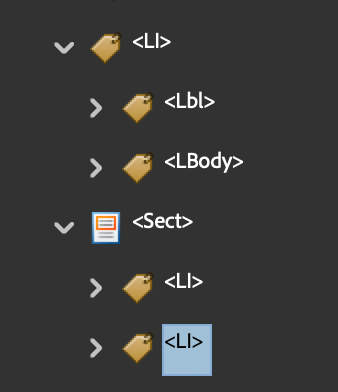
Each list item (LI) needs to be a child of a list (L). In my accessibility tags panel, I notice there isn’t a main list tag and there’s a Sect tag between the first list item and the next two.
I’m going to try adding a List tag, nesting the three list items below it, and delete the Sect tag in the middle of the list items.
Restructuring the list took a lot of dragging and dropping to get all the tags in order.
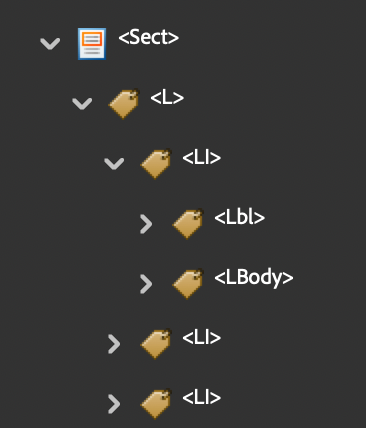
Once done, the structure is now a list (L) tag with three list item (LI) tags beneath it. Each list item tag has a Lbl and Lbody.
Since I adjusted tags, I’ll quickly recheck my tags and reading order in the Fix reading order tool. I’ll also right-click on the List items result and select Check again. It’s now passing.
Headings
My headings passed, so there aren’t any issues here. If there are issues here, it’s most likely because there’s a skipped heading level.
Now, I can use a free screen reader to navigate through the PDF to ensure everything is announced correctly and in order.
You’re ready to review and fix your own PDFs.