
YouTube captions are text of the narration. They sync with the video meaning they automatically progress with the video.
Captions are important because they make videos accessible to users who have low or no hearing. Plus, users who don’t have hearing impairments rely on captions when watching videos on mute or to better understand the content.
In this article, we’ll review how to add captions to YouTube videos plus other helpful caption information including:
- Why captions are important according to the numbers
- Options for adding captions to YouTube videos
- Automatic captioning
- Auto-translate
- Tips for writing good captions
- When to consider using a 3rd party captioning service
Rather watch the video? Watch the How to add and write captions for YouTube video.
Check out these other accessible video articles:
Why captions are important according to the numbers
Each year video content becomes more popular. As of June 2022, YouTube gets more than 500 hours of video uploaded every minute (Statistica, Hours of video uploaded).
This means there’s more and more YouTube video content that needs proper captioning.
First and foremost, captions are important because they make videos accessible. There are 430 million people in the world with disabling hearing loss (World Health Oganization, Deafness and Hearing Loss). With captions, users who have no or low-hearing can get the video’s content. Without them, that video content becomes unavailable. It can be a serious and frustrating barrier.
Secondly, people with hearing loss aren’t the only people using captions. 80% of people who use captions don’t have a hearing impairment according to research done by Verison and Publics Media.
This same research found that captions increase view time. As many as 80% of respondents were more likely to watch the entire video if captions were available.
Here are more reasons why captions are important:
- Help viewers understand the content better. Viewers who are learning a second language and watching videos at faster speeds benefit from captions.
- Captions increase engagement. PLY Media found that 91% of videos with captions are watched to the end compared to 66% of videos without captions (Newton Technologies, Captions increase viewership).
- Captions improve SEO. If people spend more time watching the video, the video’s rank naturally improves. Also, YouTube and Google use captions to better index the video improving SEO.
In short, captions help all users and can help your video perform better.
Options for adding captions to YouTube videos
Let’s get into how you can add captions to your YouTube videos. Each option is available when you upload a new video or for existing videos.
NOTE: Captions and subtitles are different. Both are synchronized text but captions are meant for users who can’t hear the audio while subtitles are meant for users who don’t understand the video’s default language. For example, a video in French with English subtitles. YouTube uses subtitles throughout its interface to refer to captions and subtitles.
Navigate to captions when uploading videos and to existing videos
Here’s how to navigate to captions when uploading a new video:
- Login to your YouTube Studio.
- Select Create > Upload videos in the top right.
- Select video from file or drag and drop video to upload.
- Complete the Details fields and select Next.
- In the Video elements section, select ADD for Add subtitles.
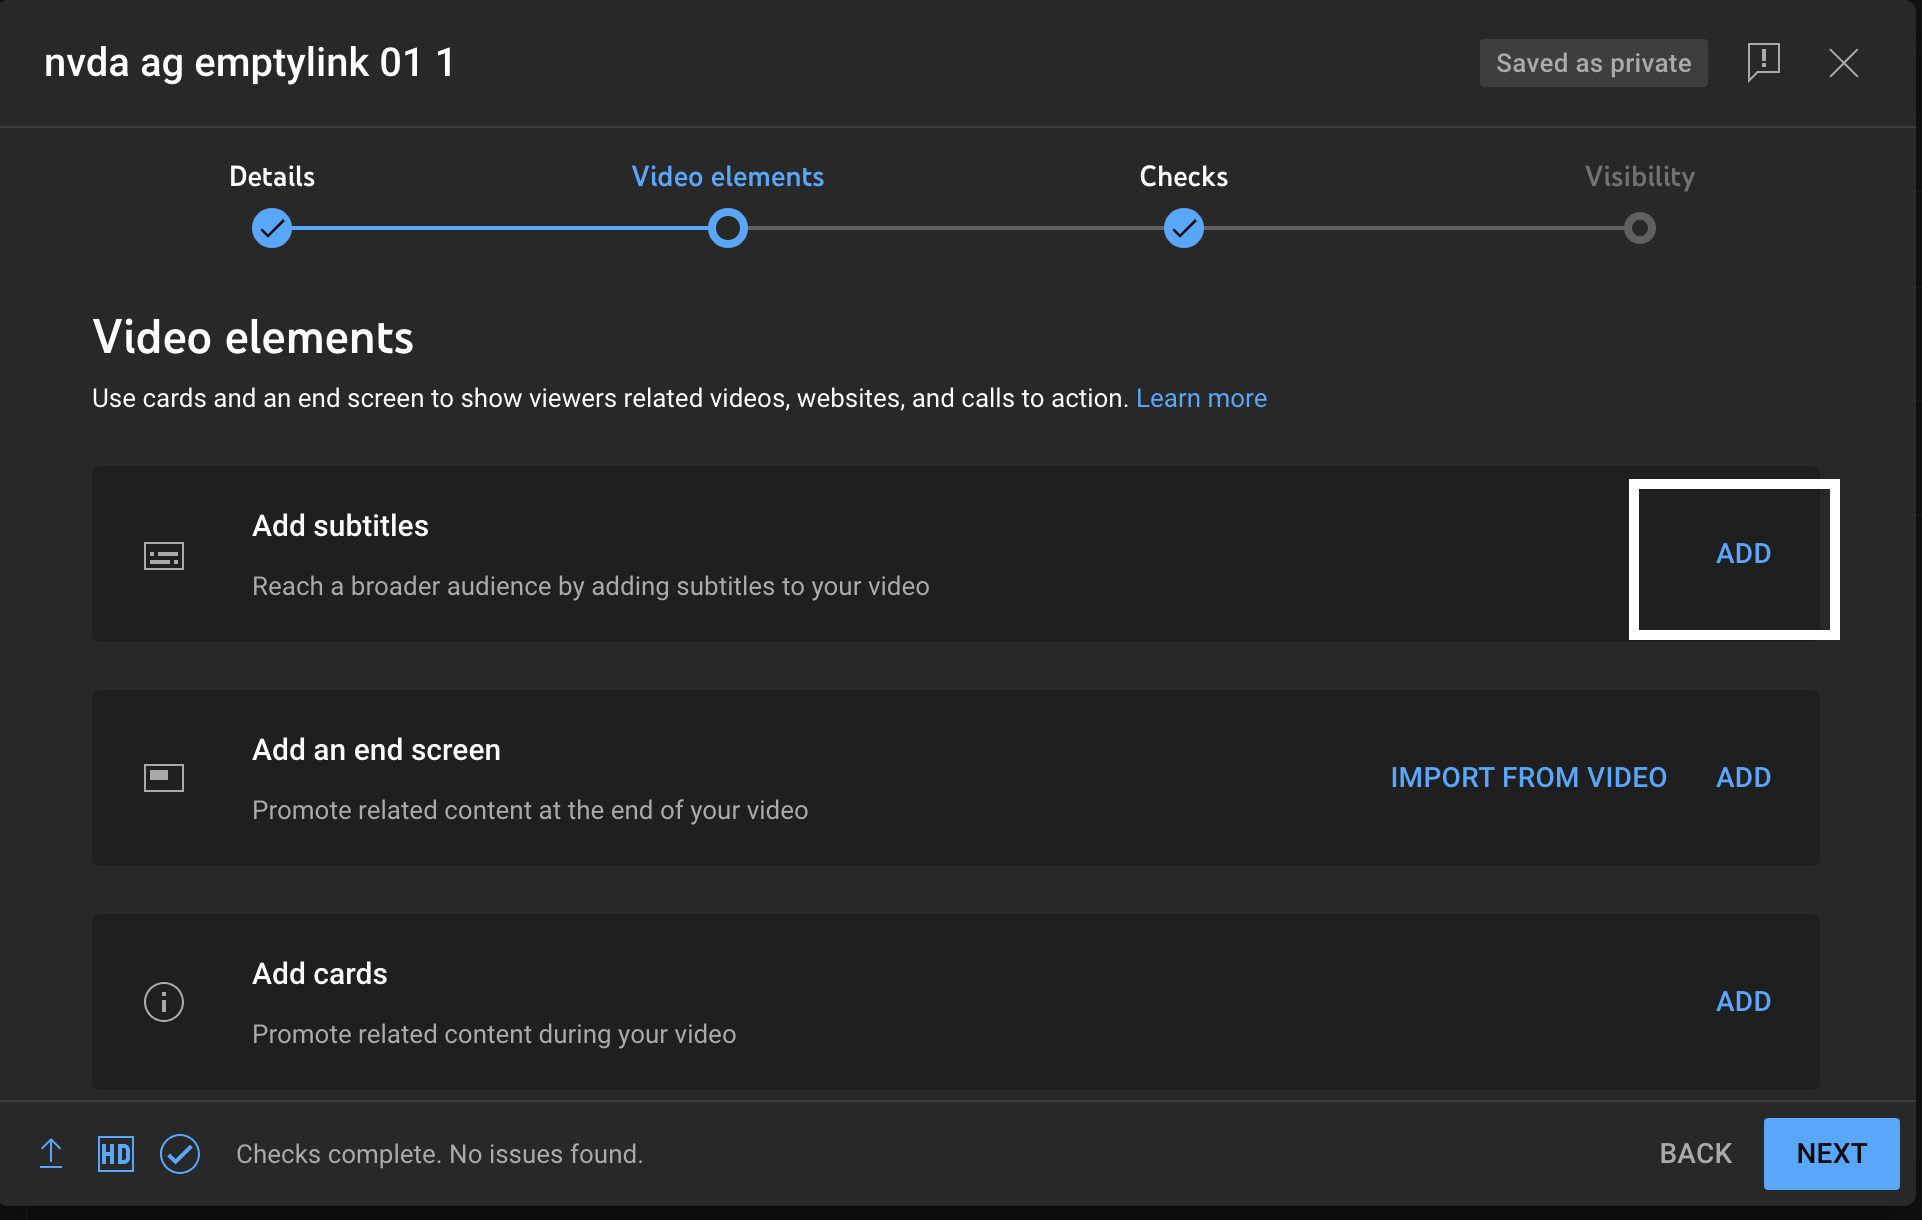
Now, you can choose one of the options for adding captions.
Here’s how to navigate to captions for existing videos:
- Login to your YouTube Studio.
- Select Subtitles in the left navigation.
- Select the video you’re adding captions to.
- Select Add language.
- Hover over the Subtitles column, and select the Add pencil icon that appears.
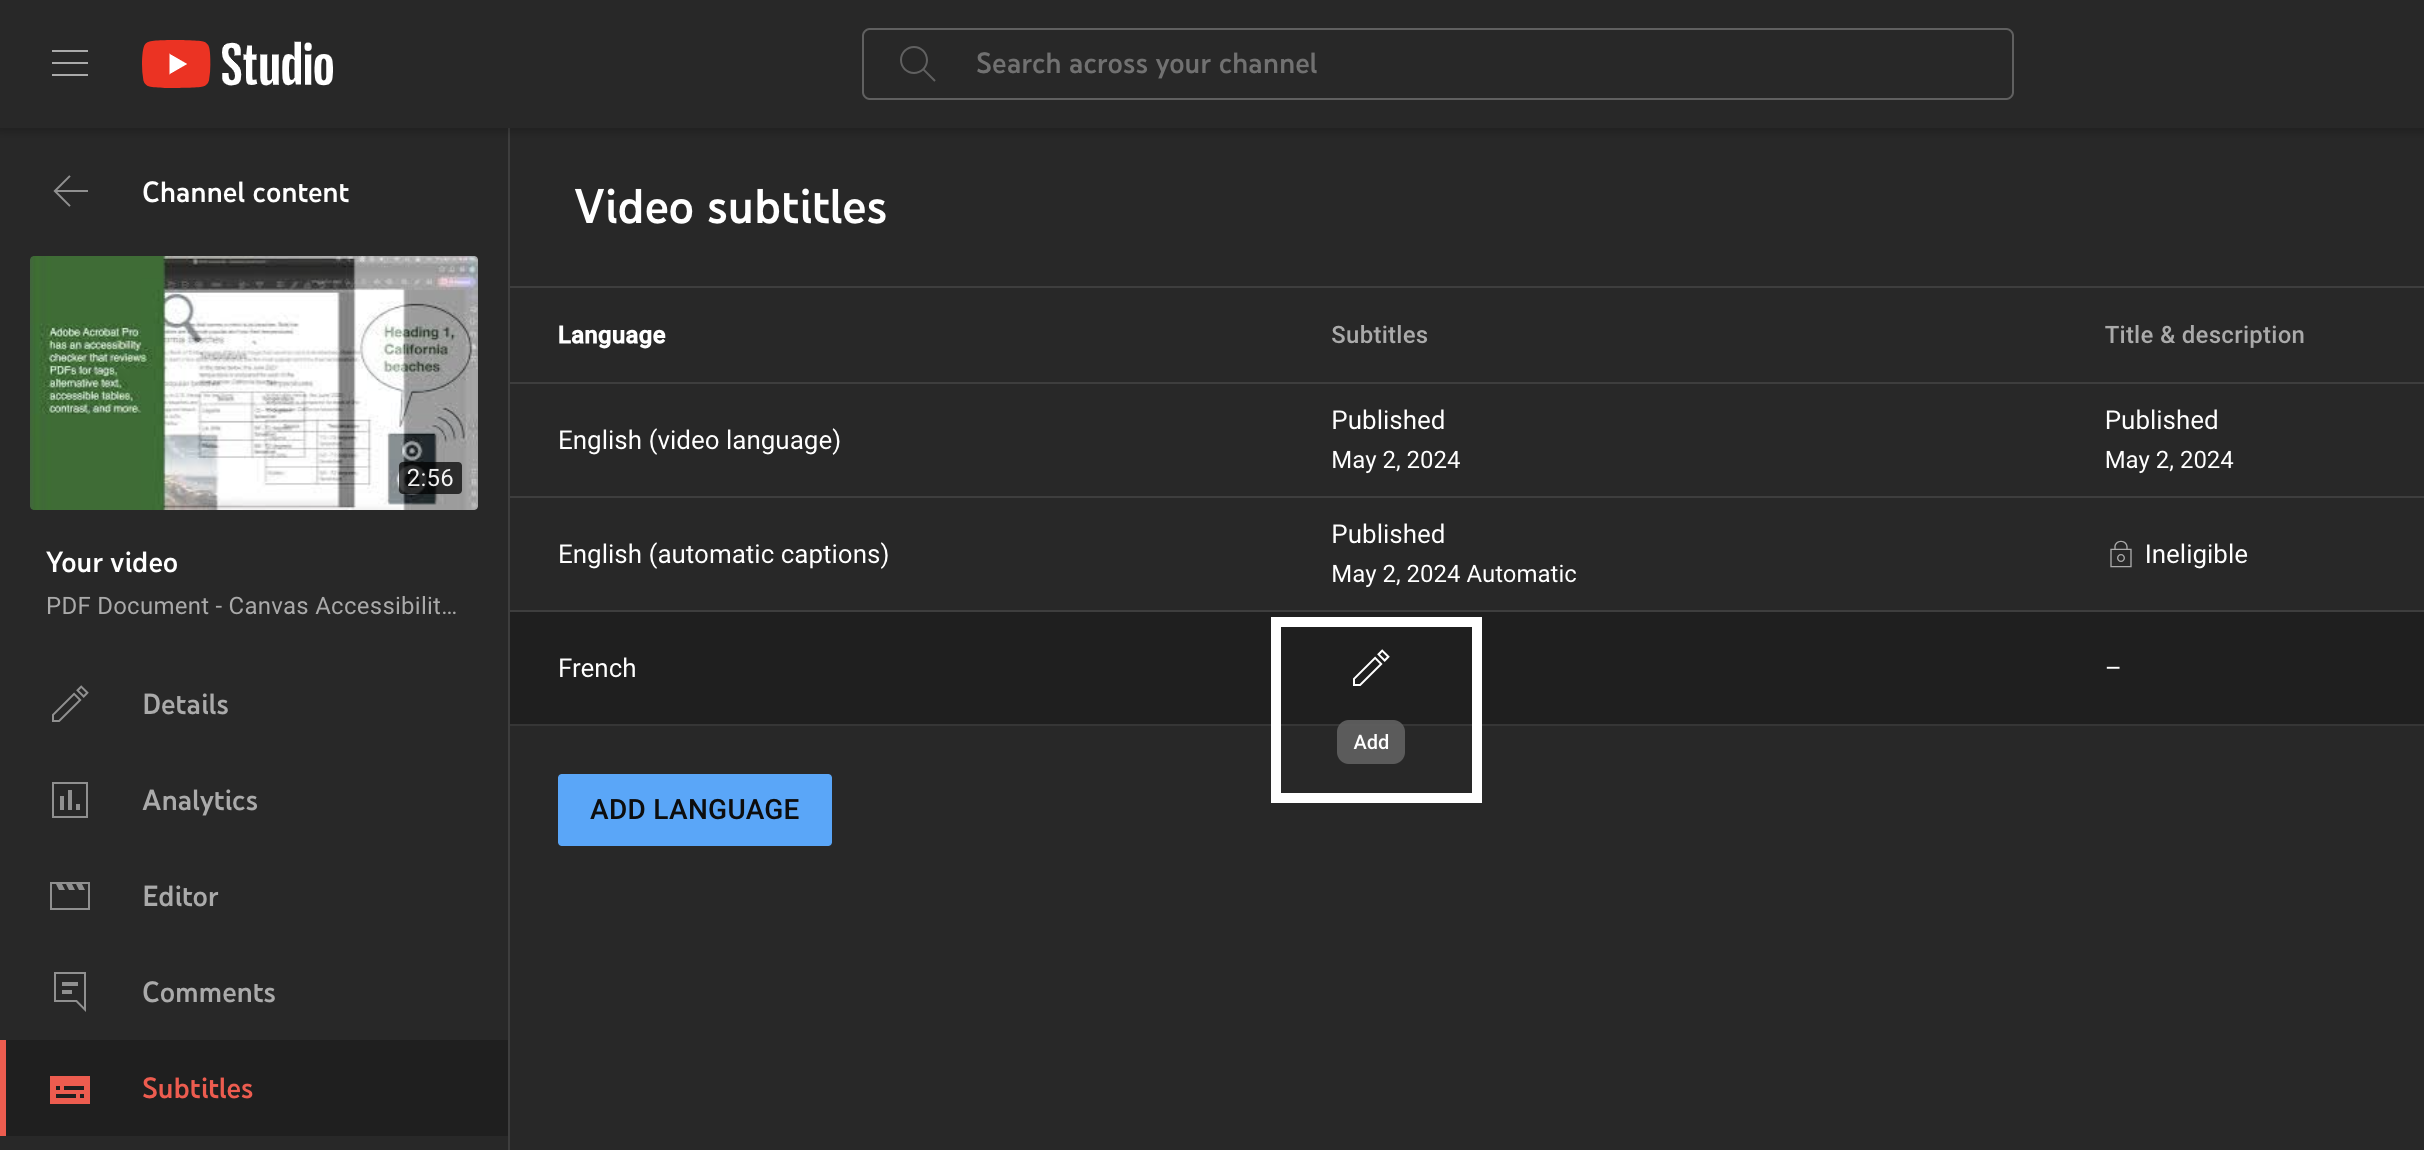
Now, you can choose one of the options for adding captions.
Upload a file
The caption file
Caption files have the text and time stamps for when the text should be displayed. The most common caption file type is .SRT.
For all the supported caption file types, review YouTube’s Supported subtitle and closed caption files.
An .SRT caption file’s formatting includes:
- Caption frame number
- Beginning and ending timecodes for when caption text should appear. Timecodes go from left to right: hours, minutes, seconds, and milliseconds.
- The text for the caption
- A blank line that indicates the start of the next caption
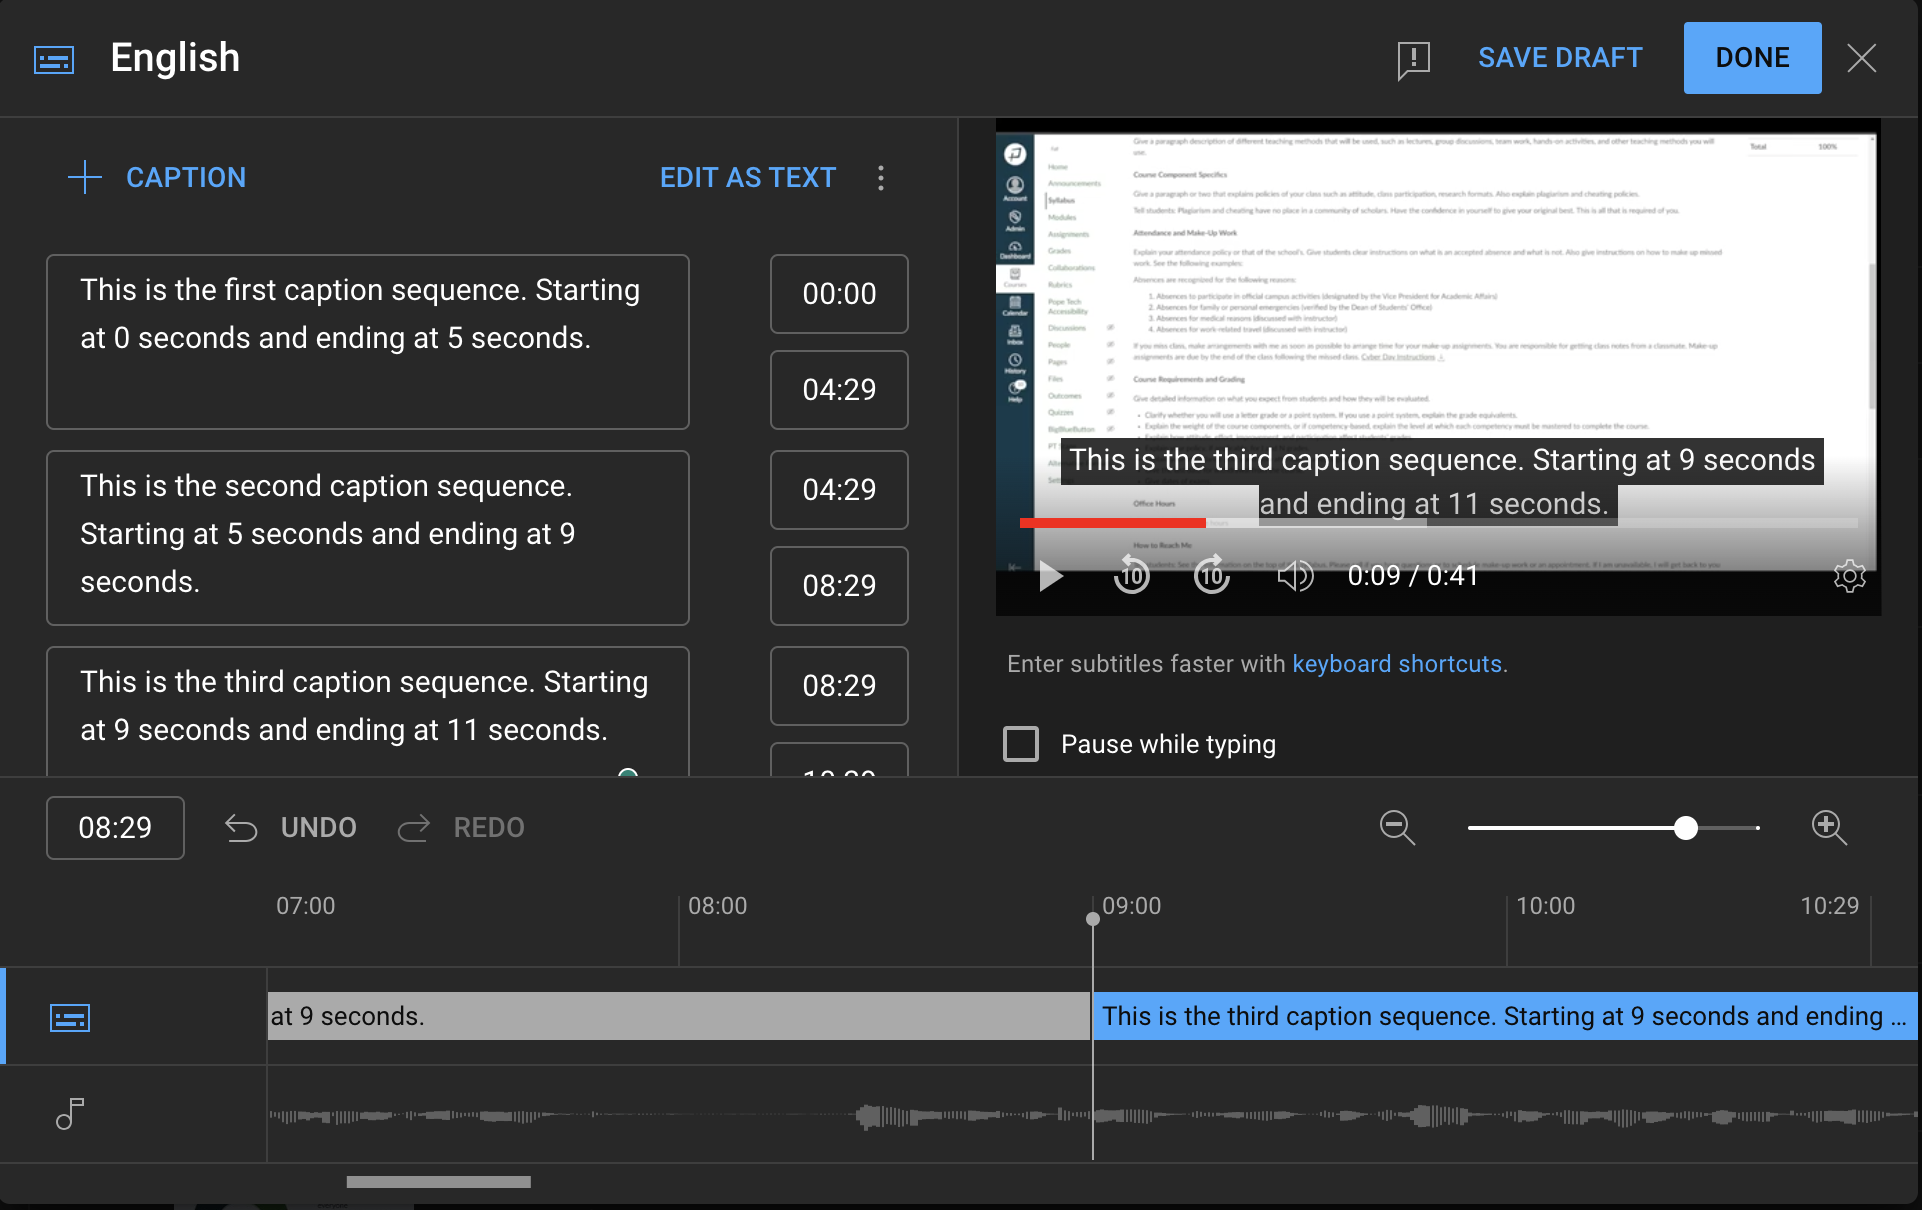
Here’s an example of how a .SRT caption file would be formatted:
1
00:00:00,000 --> 00:00:05,000
This is the first caption sequence. Starting at 0 seconds and ending at 5 seconds.

2
00:00:05,000 --> 00:00:09,000
This is the second caption sequence. Starting at 5 seconds and ending at 9 seconds.

3
00:00:09,000 --> 00:00:11,000
This is the third caption sequence. Starting at 9 seconds and ending at 11 seconds.
You can use a text editor or caption software to create caption files. Learn how to create an .SRT file on Mac or Windows. Also, if you work with a 3rd party captioning service, they’ll send the file as an .SRT or other common caption file type.
PRO TIP: If you’re using a text editor, rotating between typing, listening, and pausing the video is time-intensive. We’d suggest using one of the options below instead.
Uploading the caption file to YouTube
Once you have your closed caption file, follow these steps:
- Start uploading the new video or navigate to the subtitles for the existing video (use the steps above).
- Select Upload file.
- Select With timing then select Continue. (Typical caption files have timestamps in the file).
- Select your file from your computer’s file browser.
- Review the captions and timings. When ready, select Done.
Auto-sync
Auto-sync is best if you already have a transcript of the narration. In our article How to create audio descriptions for accessible YouTube videos, we suggest starting videos by writing a transcript because it speeds up the captioning process.
This option only works when the transcript is in the same language as the narration. YouTube might have difficulty auto-syncing the text with the audio if the video is over an hour long or has poor audio.
Follow these steps to use the auto-sync option:
- Start uploading the new video or navigate to the subtitles for the existing video (use the steps above).
- Select Auto-sync.
- Paste the transcript text into the text field.
- Review the captions for accuracy if needed. When ready, select Done. It’ll can take time for YouTube to sync the text to the video. Once the captions are ready, it’s automatically published.
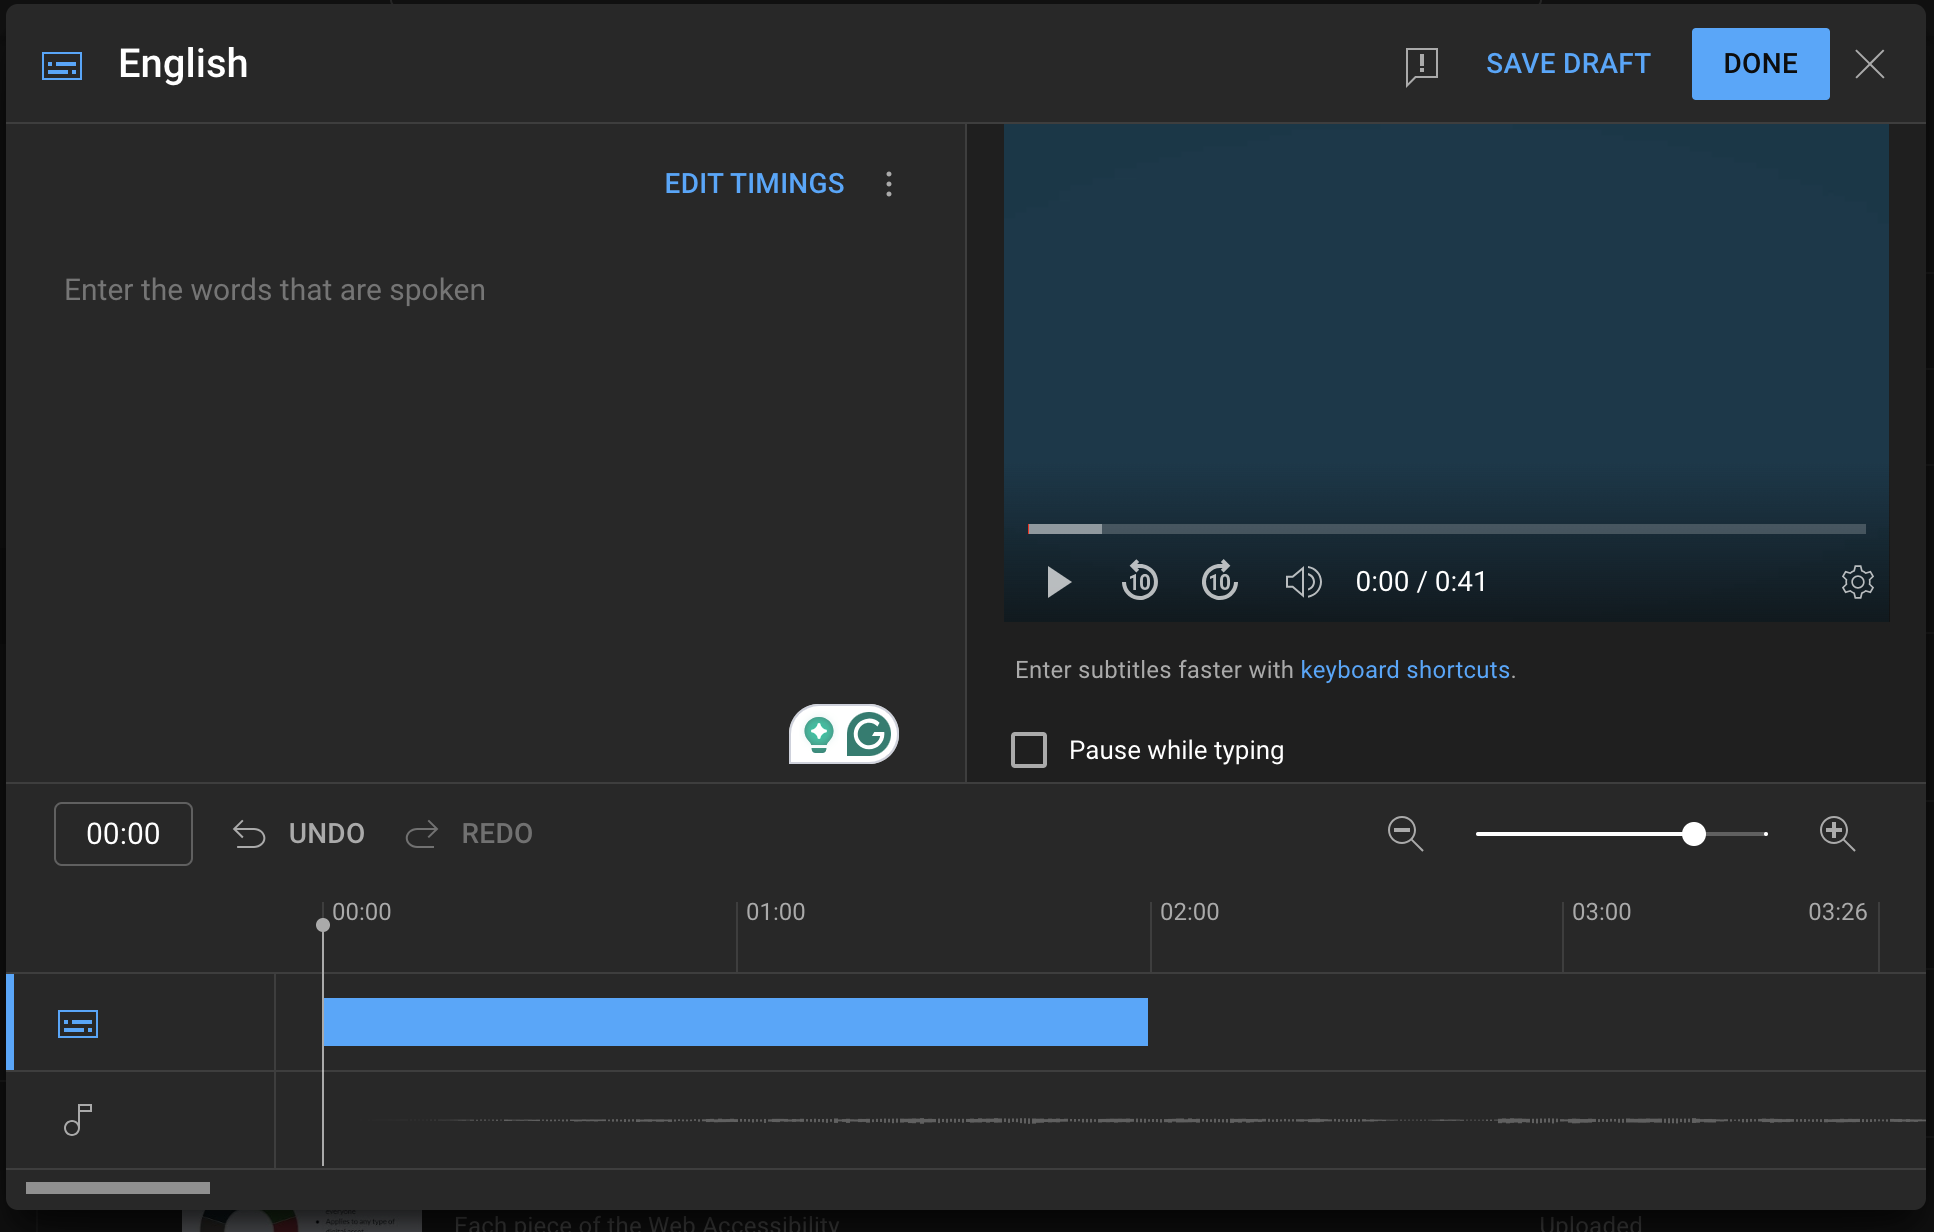
Type manually
If you don’t have a transcript, using YouTube’s Type manually option is helpful because it has some built-in options that make typing the captions easier. These include:
- Pause while typing
- Sets caption timing automatically – you don’t need to type the timestamps
- Slow down the video’s speed
- Helpful keyboard shortcuts like
- Pause or play the video: Shift + Space
- Seek backward by 5 seconds: Shift + left arrow
Follow these steps to use the Type manually option:
- Start uploading the new video or navigate to the subtitles for the existing video (use the steps above).
- Select Type manually.
- You want to be on the text editor – not the timing editor. If it says Edit as text at the top, select it to go to the text editor.
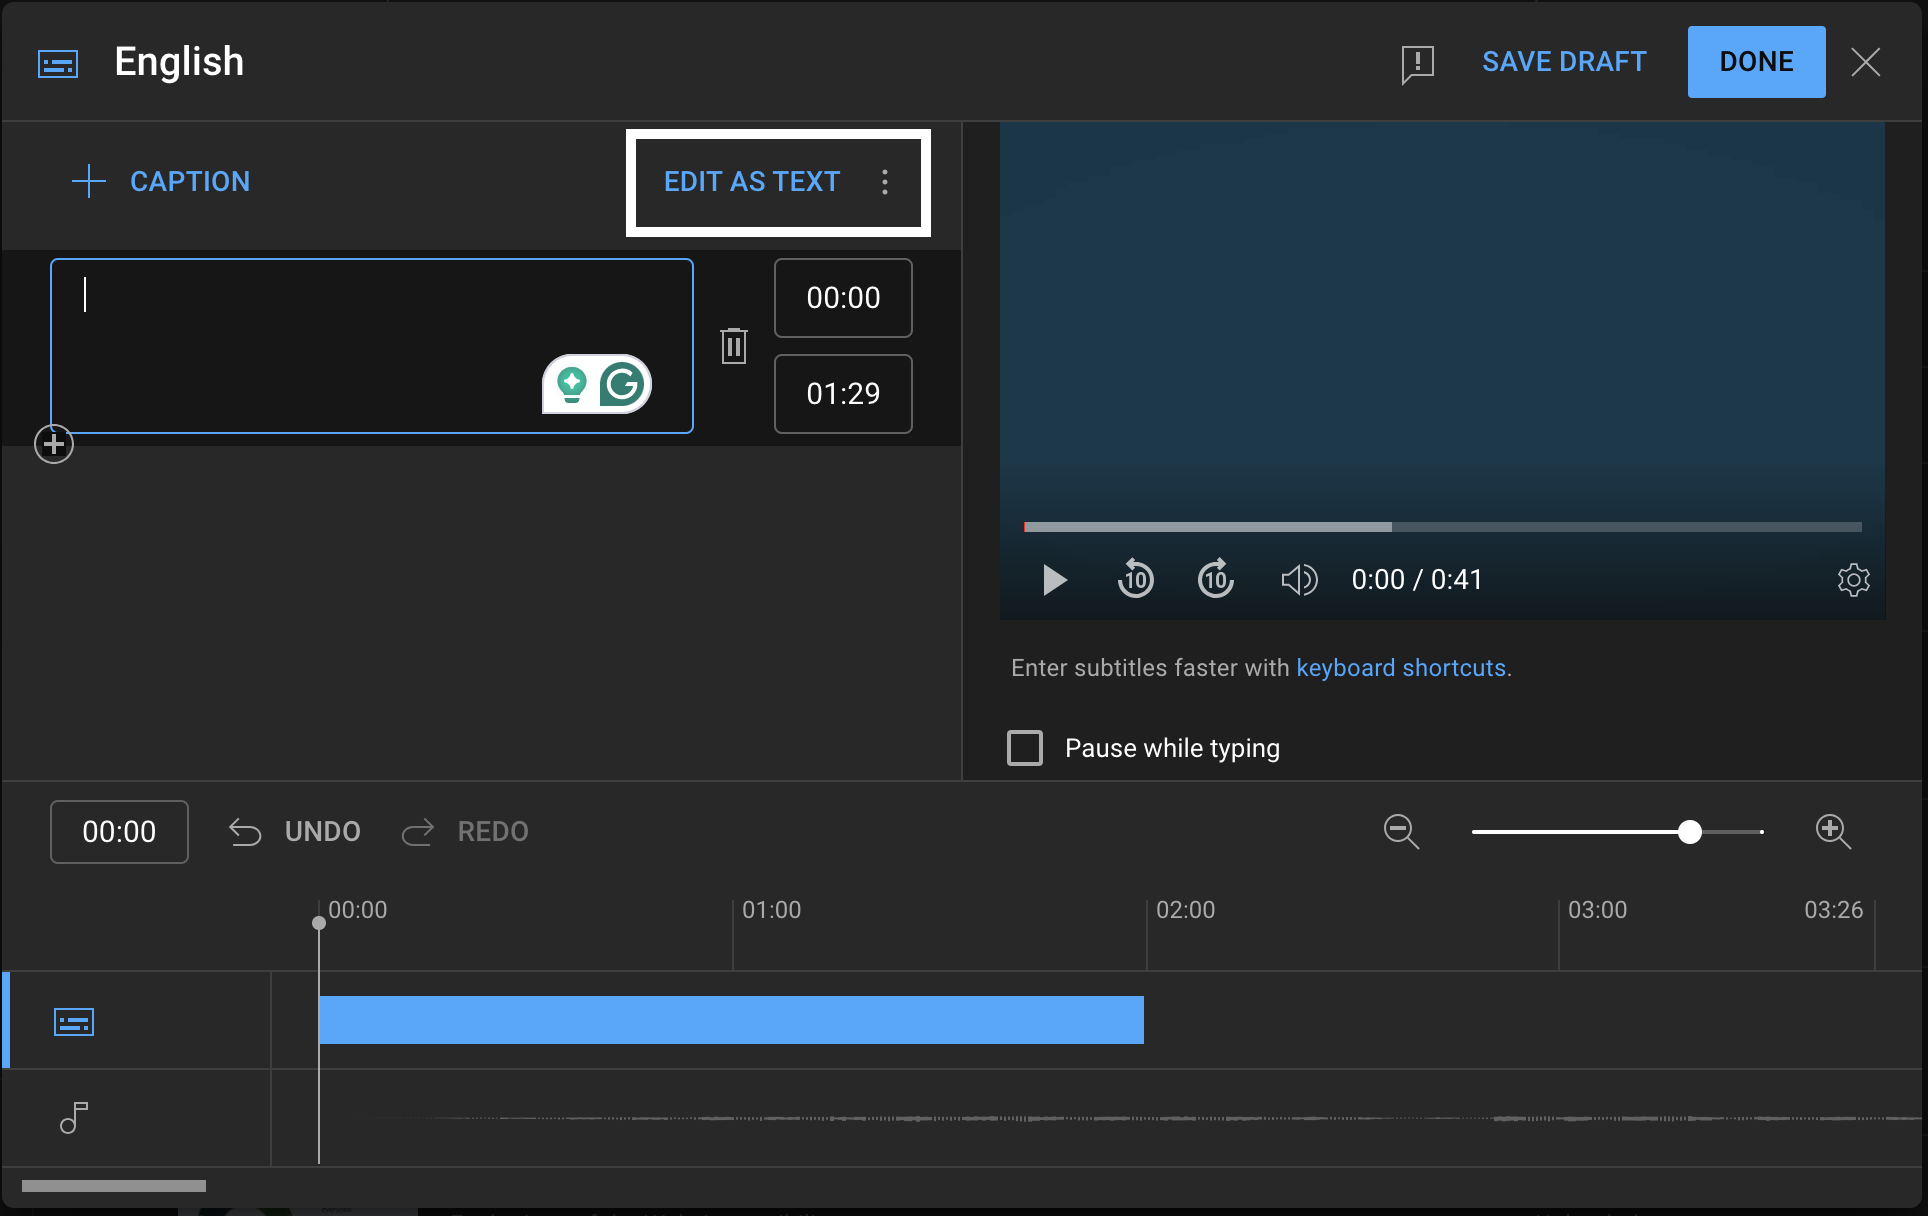
- If wanted, select the Pause while typing checkbox beneath the video player.
- Select the Settings gear icon in the video preview player options and adjust the video’s speed.
- Play the video and start typing the captions.
Automatic captioning
YouTube has automatic captioning, but even YouTube encourages you to add human-done captions since automatic captions can have errors due to mispronunciations, accents, dialects, or background noise. These issues can make the automatic captions inaccessible if they’re not accurate, so if you use automatic captions, they must be reviewed.
The great part of automatic captioning is if you don’t have a transcript, you can start with YouTube’s automatic captions to help speed up the process.
The video has to be in one of these languages for YouTube to generate automatic captions:
- English
- Dutch
- French
- German
- Italian
- Japanese
- Korean
- Portuguese
- Russian
- Spanish
- Turkish
- Ukrainian
- Vietnamese
YouTube may have issues generating automatic captions if the video is long, the audio quality is bad, or the video isn’t in one of the supported languages.
Your video will have two files when you navigate to the video’s subtitles. The first is the video’s default language with no published captions, and the video’s publish date. The second is the published automatic captions in the video’s default language.
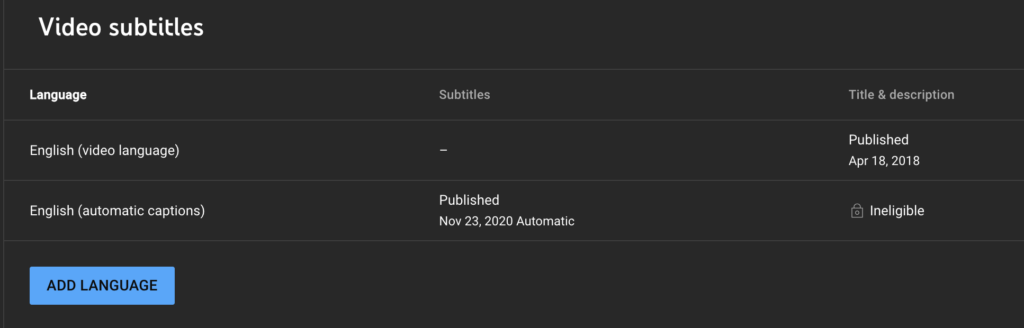
Updating the automatic captions doesn’t edit the automatic captions – it publishes or updates the video language captions.
Here’s how to review and edit the automatic captions to then publish them as captions in the video’s default language:
- Navigate to YouTube Studio and upload the video.
- After uploading the video, wait for automatic captions to process. The time depends on the video length.
- Select Subtitles in the left navigation.
- Select the video you’re adding captions to.
- Hover over the Subtitles column, and select the Duplicate and edit pencil icon.
- Add punctuation and capitalization. Make any other edits to text and timings.
- Select Publish. This publishes or updates the video language caption file – not the automatic captions.
- You can delete the automatic captions if you don’t want them as an option. Hover over the Subtitles column for the automatic captions and select the Delete trash can icon.
Auto-translate
YouTube can automatically translate video captions to other languages:
- Navigate to the YouTube video (not in YouTube Studio).
- Select Settings in the video player.
- Select Subtitles > Auto-translate. Then, select the language to translate the captions to.
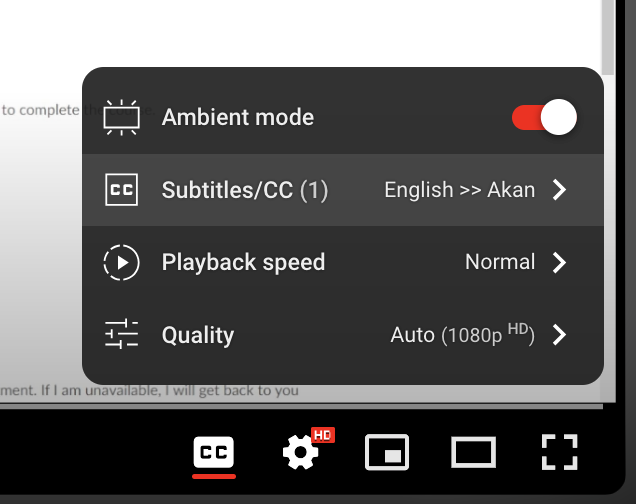
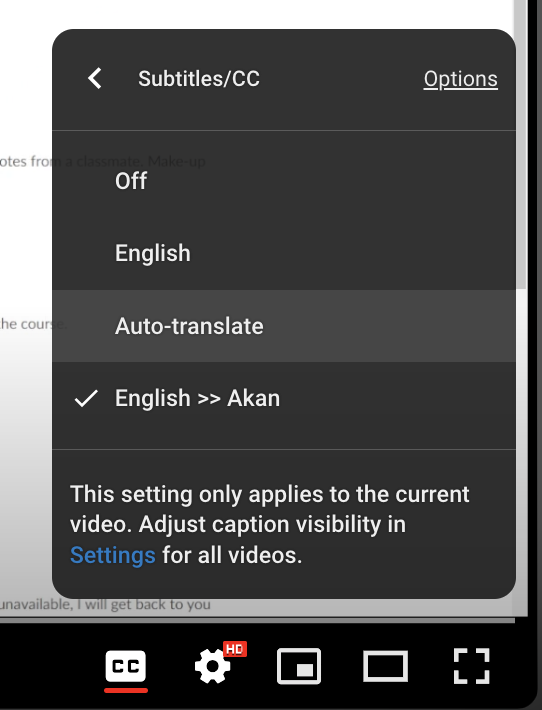
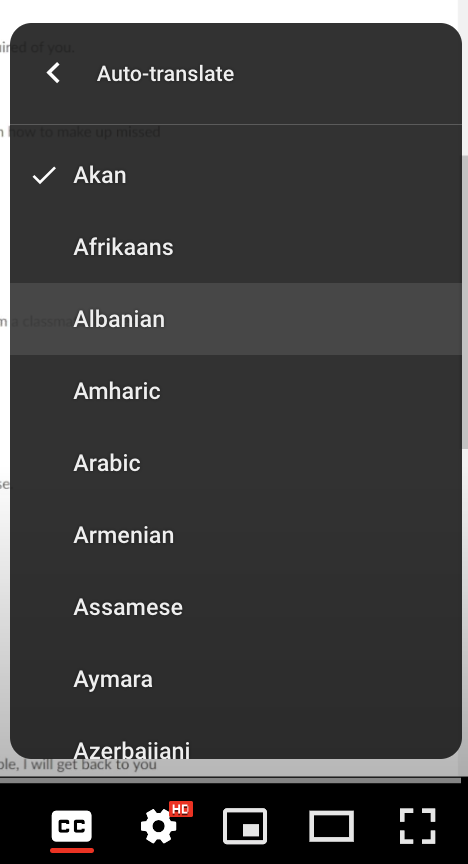
This translates the caption file in the video’s default language to the selected language.
Tips for writing good captions
Good video captions are accurate and easy to read. Follow these tips to write better video captions:
- Add typical writing conventions like punctuation and capitalization. This makes captions easier to read.
- If the speaker changes include the speaker names. For example, “Whitney: [add caption text}”
- Include music or sound effects.
- Captions should be 1-3 lines of text (most are 2 lines) and stay on the screen for 3-7 seconds.
When to consider using a 3rd party captioning service
3rd party captioning services will caption your videos for you. We’ve found using a 3rd party captioning service to be a better option when:
- The video has no script and is over 15-30 minutes.
- We’re hosting a live webinar or conference.
Typing captions with no script can take a lot of time for a beginner. A transcriptionist can transcribe 1 hour of video content in 4-5 hours. A beginner captioner can take up to 20 hours to do the same amount depending on the video’s complexity and sound quality (3playmedia).
Using automatic captions can speed up this process, but you still need to add punctuation, capitalization, and fix errors. It’s worth considering if it makes sense to spend the time doing that work or hiring it out.
Some 3rd party captioning services we’ve used are:
Check out these other accessible video articles: