
An audio description is narration that describes what’s happening on-screen. Users with visual and cognitive disabilities need the audio description to understand the visual content. If you want your video content to be WCAG AA compliant, all prerecorded videos with audio require an audio description.
YouTube now officially supports multiple audio tracks on a single video, allowing creators to upload a dedicated audio description track that viewers can easily toggle on or off. Utilizing this native descriptive audio track fully satisfies the WCAG requirement for standard audio description.
However, this built-in track requires descriptions to fit within the natural pauses of your existing dialogue. If your video requires deeper explanation, you will need to look at an extended audio description format.
There are also 3rd party plugins for purchase that add an audio description option to your embedded YouTube videos. But, we’re going to stick to ways that don’t require paying for additional software.
In this article, we’ll review the primary methods for delivering these descriptions. We will cover how to utilize YouTube’s multi-track feature for standard descriptions, how to weave descriptions directly into your script, and how to publish a separate video for extended descriptions. We will also give you advice on how to choose the best option for your content.
- Different ways to provide audio descriptions for YouTube videos
- Does your YouTube video need an audio description?
- What to include in an audio description
- Steps to create the audio description
- Considerations for creating audio descriptions for existing videos
Different types of audio descriptions for YouTube videos
There are three types of audio descriptions that’ll work with YouTube videos. They’re:
- Integrated audio description: The visual descriptions are woven directly into the main script before recording
- Native multi-track audio: A separate description track is uploaded directly to your primary video, allowing users to toggle it on or off.
- A separate video version: A secondary video is published specifically to host an extended audio description.
In the following sections, we’ll break down how to implement each of these three options so you can choose the best fit for your project.
1. Audio description is integrated with the main narration
An integrated audio description means your main narration already describes what’s on-screen. This approach works best for demos and presentations.
Integrating your description into your narration is the easiest way to create an audio description. So, even if you’re not doing a demo or presentation, still consider this option. You might be surprised.
Here are some examples of how your narration would change to include a description of what’s happening on-screen:
- Instead of saying, “Follow these steps to save your file,” say, “To save, select File and then Save.”
- Instead of saying, “Watch how I assemble these pieces,” say, “I’ll take the chair leg and put it in the hole of the chair seat. Next, I’ll use my rubber hammer to secure it into the hole.”
- Instead of saying, “This layout is better for this living room because it’s easier to walk through,” say, “The couch is up against the wall instead of in the middle of the room, which makes a natural walkway.”
2. Native multi-track audio
YouTube now allows you to upload an additional, separate descriptive audio track to your primary video file. Viewers who need the description can toggle this secondary track on using the video’s settings gear icon, while other viewers hear the standard mix.
This is best for standard audio descriptions where the narration can comfortably fit inside the existing pauses for your videos’ dialogue.
This option allows you to keep all your descriptions on a single video. This means you preserve one single URL, keeping all your views, comments, search rankings, and analytics intact.
However, because this is a new feature, not all content creators have access to this capability yet.
3. A separate video with audio description narration
The other option is a separate video with narration just for the audio description. So, there are two versions of the video: one with just the main narration and another with the main narration plus narration that describes on-screen visuals.
Common types of videos where this would be a better option are entertainment videos, some marketing videos, or any video where describing the visual doesn’t naturally fit into the main narration.
Here are tips for recording the audio description narration:
- Use a voice that’s different than the other voices in the video.
- Use a neutral tone that doesn’t have much emotion.
- Add the narration at the same time as the visual content or right before it.
- Make the description clear above the main audio.
The video below is one of W3C’s accessibility perspective videos with an audio description:
Notice how it would not make sense to include what each person is doing in the main narration, so having a separate audio description is better for this video. The audio description also fits between the pauses in the main narration.
If the audio description doesn’t fit between the natural pauses, the video can be edited to include longer pauses, so the audio description narration can fit.
Does your YouTube video need an audio description?
If you want your YouTube content to be WCAG AA compliant (which is what the majority of websites aim for), all videos with audio need an audio description. Fortunately, YouTube’s multi-track audio feature means you can now meet this requirement directly on your original video rather than managing multiple uploads.
You can use Pope Tech’s Web Accessibility Platform Free Plan (up to 25 pages, free for life, no credit card required) to start inventorying your website’s videos. From there, you can check if the video needs or has an audio description.
YouTube videos that don’t have audio (they’re video-only) have the option to either provide a separate video with an audio track describing the visuals or a link to a descriptive transcript. Descriptive transcripts include the audio as text alongside a description of the on-screen visual. Here’s an example of a descriptive transcript.
What to include in your audio description
So, you have a YouTube video with audio and need an audio description. Whether you’re integrating the audio description or creating a separate audio description, the next question is: what should the audio description include? How detailed does it need to be?
Here are some guidelines to follow:
- Describe the visuals that are important to understand what the video is communicating. Don’t describe every detail.
- Just describe the visuals – don’t interpret the visuals.
- The description should be in the present tense, active voice, and third person.
- If the video has information that’s only provided through text (like someone’s name, email, or content) all the information conveyed by that text should be included.
Example 1
Let’s go through an example. Here’s a still from our Easy way to create accessible videos with audio YouTube video.
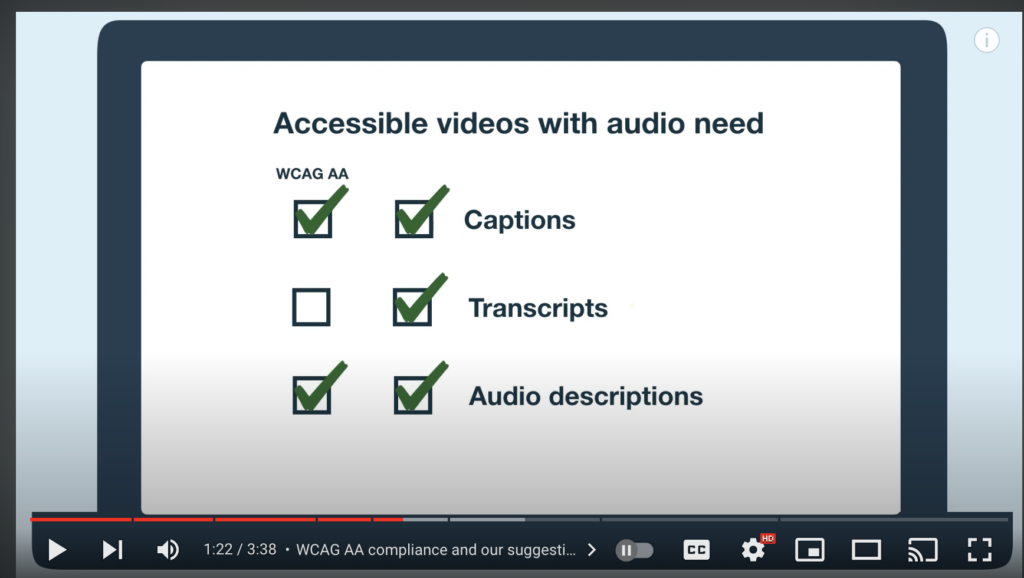
I don’t need to describe that there are two rows of green checkmarks. What I do need to convey is the purpose of this visual, which is to show that captions and audio descriptions are needed to be WCAG AA compliant, but Pope Tech also suggests including transcripts.
I was able to integrate that into the main narration by saying, “Before we begin, WCAG AA compliance only requires captions and an audio description. But, we suggest also including a transcript because it is so easy to make after creating captions.”
Example 2
Let’s go through one more example. This still is from The Legend of Zelda: Tears of the Kingdom trailer.
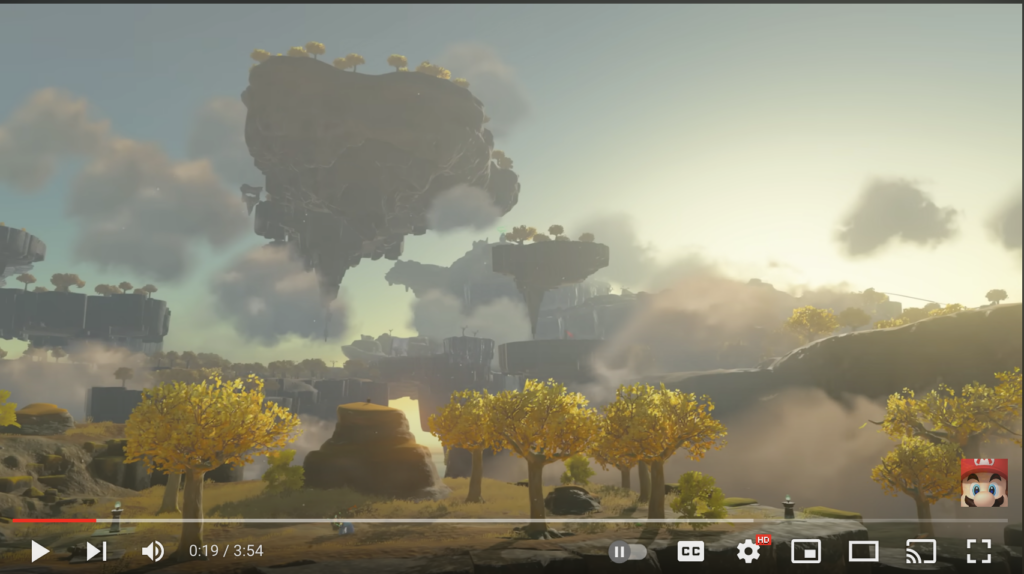
There’s a lot that could be described here. There are trees, floating islands, and clouds at sunrise. But, the important part of this visual to communicate is the floating islands because they are a new part of this game.
The audio description narration might be something like, “Several floating islands.” We wouldn’t want to say something like, “Several floating islands ready to explore” because that’s adding commentary and interpretation of what the floating islands are for.
Steps to create the audio description
Creating an accessible video involves a few universal preparation steps, followed by a specific technical process depending on how you choose to host your files on YouTube. These steps are best for new videos but could be used for existing videos too.
Phase 1: Shared preparation steps
Before opening YouTube Studio, you need to organize your script and audio assets. This foundational workflow saves time regardless of your eventual method.
- Write a unified script: Even a loose script ensures you plan exactly where visuals need explicit verbal explanations. A finalized script also makes captioning much faster later.
- Identify essential visuals: Only describe visual elements that are critical to understanding the core message. You do not need to describe decorative backgrounds, but you must read text that appears on-screen if it is not spoken aloud.
- Plan your timing and voice: If you are recording a secondary description track, use a voice with a noticeably different tone or pitch than the primary speaker. Deliver the descriptions in a steady, clear voice.
Phase 2: Choose your technical workflow
Once your files are recorded and edited, follow the specific step-by-step path for your chosen approach.
Option A: The integrated process
Because your descriptions are woven directly into your primary script, you only have one standard video to manage.
- Upload your video: Start the standard upload process in YouTube Studio.
- Add captions: During the Video Elements upload step, select Add Subtitles.

- Use Auto-sync: Copy and paste your script into the text box. YouTube will automatically calculate the timestamps and align your text with the audio.

- If you don’t have a script, use YouTube’s auto-generated captions. They’ll take a few minutes to generate. Edit them by going to the Video’s details > Subtitles > Duplicate and Edit.

- If you don’t have a script, use YouTube’s auto-generated captions. They’ll take a few minutes to generate. Edit them by going to the Video’s details > Subtitles > Duplicate and Edit.
- Verify the transcript: Once published, YouTube provides a full text transcript based on your captions. Viewers can access this by selecting … more in your video description and scrolling down to Show Transcript.

If you need more assistance with subtitles, here’s our article on adding captions to YouTube videos.
Option B: The native multi-track process
This method attaches your secondary audio description track directly to your primary video file. Remember, this option only works if your audio descriptions fit within the natural pauses of the original audio file.
Critical mixing rule: YouTube does not dynamically overlay your description track on top of your original video. Instead, selecting the descriptive track completely replaces the primary audio. Because of this, you must export the complete audio mix from your video editor that contains your original dialogue, sound effects, background music, and the new descriptions mixed together. Balance these audio levels before exporting because YouTube cannot adjust your volume ratios after upload.
- Upload the primary video: Upload your standard video file normally and apply your default captions.
- Navigate to languages: In the left menu of YouTube Studio, select the Languages tab, then select the video you want to edit.

- Note: If you cannot find the Languages tab, you might not have the capability to use this feature in YouTube Studio yet.
- Open the edit dialogue box: Next to Video Language, select the edit icon.

- Add the descriptive track: On the Audio line, select the menu, and Add Descriptive Audio.

- Upload your file: Select your audio-only file (like an MP3 or WAV file) that matches the exact length of your video, then select Publish.
- How viewers control it: Viewers can click the video player Settings gear icon, select Audio track, and switch the stream from Original to Descriptive.

Option C: The separate video process
Use this method for extended audio descriptions where you must physically alter the video timeline to allow for longer visual descriptions.
- Export your two separate video files: Create your standard edit first. Then, create a secondary edit where you splice the video timeline to pause the action, giving your descriptive narration enough time to play before the video resumes.
- Upload both versions: Upload both files to your channel as separate public or unlisted videos.
- Caption both files: Follow the standard caption upload steps for both videos.
- Link the videos together: Use the video description or in-video cards to prominently link the two versions to each other so viewers can easily find the accessible option.
Now, your video has an audio description since it’s included in your main narration. It also has captions and a transcript.
Considerations for creating audio descriptions for existing videos
If you aren’t sure what existing videos your website links to, you can use Pope Tech’s Web Accessibility Platform Free Plan (up to 25 pages, free for life, no credit card required) to find any YouTube embeds or links. From there, you can check the YouTube video’s accessibility.
Here are some considerations when making existing videos accessible.
You no longer lose your URL or data
In the past, retrofitting a video with audio descriptions meant deleting the old video, editing a new version, and re-uploading it from scratch. This was a painful process because any views, comments, search rankings, and analytics started completely over at zero.
With YouTube’s current features, you can make your existing videos accessible without sacrificing their historical data or changing their web addresses. Your strategy just depends on your video’s specific timing needs:
- For standard descriptions that fit in natural pauses: You can record your descriptive track and upload it directly to the existing video URL through the Languages tab in YouTube Studio. Your original video file remains exactly as it is, and your data stays intact.
- For extended descriptions that require longer pauses: You will still need to upload a secondary, edited video version to accommodate those pauses. However, you do not need to delete the original, successful video. You can keep the primary video up and simply add an in-video card or a prominent link in the description that points to the accessible version. This protects your original data while still ensuring users have a clear path to the content they need.
Time and resource considerations
While you no longer face the penalty of losing your channel metrics, updating old content still requires an investment of resources. You will need to re-familiarize yourself with the old video content, write a fresh script, record the voiceover, and ensure the final audio file is properly mixed and balanced.
Planning for accessibility from the beginning of your production cycle is still the most efficient choice. Long story short: it’s easier to include the audio description from the start instead of going back.
Learn more about accessible videos and audio: