The motivation behind this post is that technical resources for implementing accessibility techniques, especially with modern Javascript frameworks like Angular, are very sparse. There also seems to be a misconception that modern Javascript frameworks impede your ability to make your web application accessible. While there are some accessibility pitfalls involved in using frameworks like Angular, there are also many benefits, and I want to go over some of the lessons I’ve learned while building an Angular powered platform that strives to be as accessible as possible.
I also want to point out that there are many aspects to web accessibility, but this article focuses on keyboard and screen reader optimizations.
Table of Contents
SPA Considerations
It doesn’t matter what technology you use, if you’re building a Single-Page Application (SPA), there are some extra considerations you must make to ensure that it is accessible. In this section, we’ll briefly cover some of these areas. Later, in the Recipes section, we’ll get into the details of how to solve these concerns using Angular.
1. Route Changes
The biggest difference between a traditional web application and an SPA is dealing with navigation. In a traditional web application, on each page change and on most user interactions such as form submissions, the web page reloads, focus gets reset, and the page title changes (if you are using proper page titles). If your user is using a screen reader, it will announce the new page title, and it will make them aware that the new page has loaded. In an SPA, you must manage this manually.
I’ve seen a few ways to accomplish this, but the easiest way to do it is to set focus to each page’s H1 element when it comes on screen. I will go over how to do this with Angular later on.
Another option is to have a div with specific wording to show a new page has loaded, which only appears on screen readers. Something like “The contact page is now on-screen”, and set focus to that div on each route change.
You could also set focus to the skip link or header on each route change to emulate how a traditional web application behaves. These are all valid options, but best practice will depend on your specific use-case.
2. Form Validation
Form validation is another important area to consider when building an accessible SPA. Similar to route changes, focus management is key here. To ensure a good user experience, make sure that focus gets set to any error messages after submission. Useful error messages are clearly linked to a specific input field, with clear directions for fixing it.
Another common issue I’ve noticed with SPA forms is that the submit button is disabled until the form is valid. Don’t do this! Your user should be able to submit your forms in any state, and if the form is invalid, it should provide clear direction on how to fix it. This will greatly improve usability for screen reader and non screen reader users alike.
Here is a great post about implementing accessible forms using Angular: https://simplyaccessible.com/article/accessible-forms-angular/
3. Lazily-loaded content
This is a big one, and one you don’t usually have to even think about for traditional web apps. There are a wide range of solutions for solving this issue, and it’s one that I’m still refining on the Pope Tech platform.
Lazy-loading all your content is a very popular method for SPA’s as it dramatically improves the initial page load. If you have lots of different content areas, you can split a giant API call into several smaller ones. The problem is that this content will not get presented to screen reader users. If they’re on a slower connection, they may have explored the page before the content gets loaded and concluded that it’s an empty page.
The best solution I’ve found involves using aria-live regions. You can use an aria-live region as a way to notify screen reader users when certain content has loaded. Do not, however, just throw all your content into an aria live region, this will cause your entire page to be read when it gets loaded in. Stick with short descriptive messages such as “content loading” and “content is now on-screen”. If in doubt, test with a screen reader!
If you’d like to read more about aria-live regions and the available options, check out this article: http://juicystudio.com/article/wai-aria_live-regions_updated.php
4. Notifications
There are 2 main ways to handle app-wide notifications such as toast notifications for keyboard and screen reader users.
The first is to use an aria-live region. You can give the aria-live attribute to your toasts container and any notifications get presented to screen readers users.
The other option is to use focus. You can set focus to the notification when it appears and it will get presented to screen reader users as well. You may want to have your notification remains on-screen until it is no longer receiving focus, this will prevent the notification from being unexpectedly dismissed.
5. Page title
Page titles are important for accessibility for a few reasons. Generally, it’s the first thing that gets read by screen readers when the page loads and it should give the user an idea about what’s going to be on the page.
In a round-trip website or application, the page title is determined before the browser loads the page since the content is being served by the backend. If you’re building a SPA, however, you must set the page title dynamically based on the route on the front-end.
In addition, a screen reader will not read the page title on subsequent page changes since the page doesn’t actually change, Javascript just swaps out the content on the same page.
It is still important to manage the title, as it will be read if the user switches to a different tab and comes back, if they move to a different window, and on the first page load.
If you’ve taken care of managing the page title, you will also see benefits if you switch to server-side rendering for SEO purposes since the page title will be properly set.
UI Package Pitfalls
UI packages have their own section because they were, by far, my most problematic issue during my first accessibility audit on the platform. In the MVP stages I was in a rapid prototype mode and I just grabbed any package that looked good and did what I needed. This included datatables, tree components, switch toggles, comboboxes and Angular bootstrap packages. At best, some of these packages had minor accessibility issues, and at worst they were completely inaccessible. Testing the accessibility of any 3rd-party package that you bring into your project is important.
One options for mitigating future issues is to wrap all your 3rd-party components in your own component and use that throughout the app. This way if you ever have to switch components for any reason at all, accessibility or otherwise, you just have to change the internals of your wrapper component and the changes will be made app-wide for free. In my opinion, this is one of the biggest benefits of using something like Angular.
1. Datatables
This is by far the biggest problem area when it comes to inaccessible Angular packages. I may be missing some packages and if I am, please let me know in the Twitter thread, but out of the few times I went searching, I only found 1 package that met all of our requirements and was even remotely accessible. There are still a few minor accessibility and responsive issues with this package, and I’ve forked it to make some improvements. The fork is not on NPM yet but I am planning on publishing it soon. In the meantime, you can check out the original package as it’s by far the best Angular Datatable package in terms of accessibility.
Original: https://github.com/brunano21/angular-4-data-table#readme
Fork: https://github.com/pope-tech/ngx-table
2. Bootstrap
Pope Tech uses Bootstrap which has great accessibility support, but there are multiple Angular packages that implement the Javascript based components such as toggletips and modals. I didn’t notice until I already implemented most of the components that the one I chose was completely inaccessible. Luckily, there is an alternative that has great accessibility support built-in.
https://ng-bootstrap.github.io/#/home
3. Tree Components
The Pope Tech platform includes a tree component to help you manage your group hierarchy. There are a few tree components for Angular out there, but I only found one that supports keyboard navigation. This is a great example of why you should employ multiple forms of accessibility testing.
I thought the fact that the tree was keyboard-navigable was enough to consider it accessible. It turns out there was no way to navigate to the tree by keyboard only, which I should have caught during testing. In addition, it wasn’t presenting any content to screen readers even after being focused. It was completely inaccessible and I wasn’t even aware until I tested with a screen reader.
Since there wasn’t any other package (even the Angular Material tree component is completely inaccessible!), I decided to fork this package and add aria support. This forked version is what we’re currently using on the Pope Tech platform, and while it’s not yet perfect, it’s at least usable. I am planning on submitting a PR to make these changes available to everyone in the near future.
https://github.com/500tech/angular-tree-component
4. Toggle switches
I am a fan of using toggle switches rather than checkboxes. I think that they look better and are easily understood by the user. That being said, all the toggle switch packages for Angular that I could find are inaccessible. While you can accomplish the same look and feel using CSS and Javascript, which we might do in the future, I decided to change all the toggle switches to checkboxes. Sometimes just using native HTML elements is the best option for remediating some of the issues you run into when you override native browser behavior.
Recipes
Let’s dive into some code. I want to go over some common accessibility techniques and how you can implement them in Angular.
1. Skip Link
WebAIM has a great article on skip links so I won’t explain the benefits here. I initially thought you could implement this using Angular’s routerLink and fragment directives like so:
This doesn’t work! If you activate that link, nothing happens. I tried a lot of combinations using native attributes but nothing worked. The thing that finally got it working was the following code:
I also found a blog post with an alternate method. I personally prefer the method above since it’s as close to a native skip link as possible, but the following, which uses a button and calling the focus method on the HTML element itself, works as well.
2. Focus Management
Focus management is a huge piece of web accessibility, especially when it comes to SPA’s. There are many interactions which change what’s on screen, and you need to make sure your app focuses on those elements appropriately. There are a few techniques you can employ using Angular to manage focus.
Scenario 1:
Let’s say you have a content or form section that is initially hidden, and comes into view when the user presses a button.
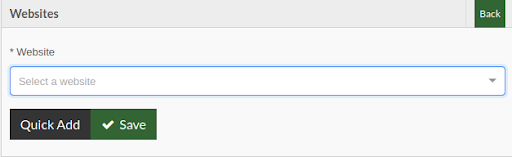
Take for instance, the website widget on the group screen in the platform. The initial view is showing the websites list.
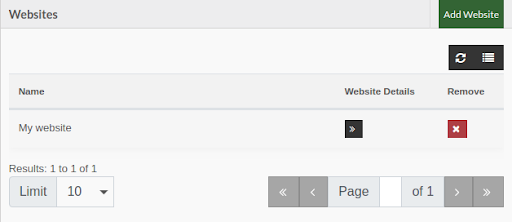
When the user activates the “Add Website” button, the screen changes to the website form. When interactions like this happen, you need to make sure you are setting focus to the appropriate element, in this case the first and only field in the form.
You can accomplish this in Angular in the following way:
A few things are going on here. First, if you don’t know about ng-container, go check it out! It provides a convenient way to use structural directives without adding unnecessary divs and spans.
Second, you may have noticed that the focus() call is wrapped in a setTimeout() function. This is because the browser needs to perform an update before calling the focus method or else the element you’re trying to focus on won’t be on-screen and it will fail.
Scenario 2:
You are using dynamic form inputs where the user can add or remove inputs by activating a button. Take the external email addresses field on the reports screen in the platform for instance.
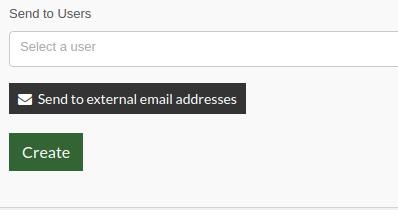
The interface starts with the “Send to external email addresses” button. When you activate that button it adds a new text input for an e-mail address.
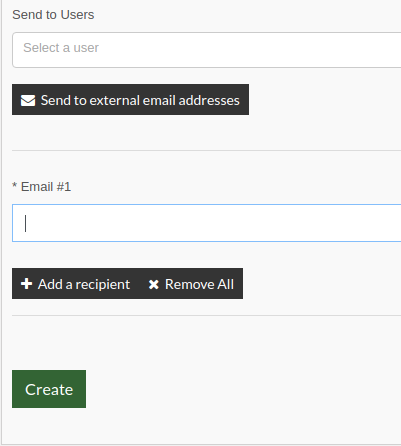
When a new field gets added it should receive focus.
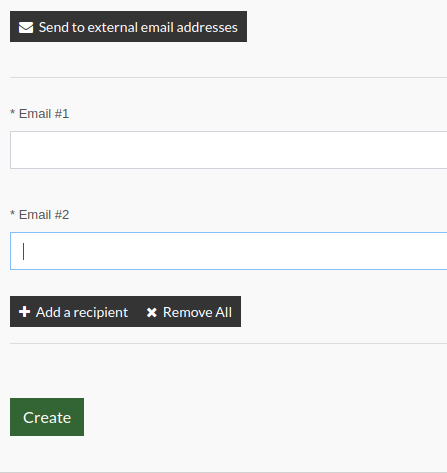
When a field is removed, the previous field should receive focus, and when all fields are removed, the “Send to external email addresses” button should receive focus. You can accomplish a large part of this with a custom directive on your dynamic input field.
This takes care of setting focus to the input when it is added. Now we have to make sure that focus is returned to the previous element when an input is removed. We can just grab the index of the input being removed, subtract one, and focus to that id. Now add a call to focus on the main button when all emails get removed and you’re done!
Scenario 3:
The route changes and you want to focus on the H1 tag. We can hook into the router events again to make sure this happens on every route change automatically.
Make sure your H1’s are focusable by setting tabindex=”-1″ and then subscribe to the router events.
Scenario 4:
You want to set focus to an Angular component but can’t use a tag name, id, or class. I ran into this when I tried to focus on a combobox component using the ng-select package. We can accomplish using Angular’s View Child decorator. I suggest only using this method when a more native approach like using document.getElementById is not available.
You can pass a component class or string identifier into ViewChild which is defined by declaring it on the component prepended by a ‘#’ like the example above. You can then access that component directly. Note that the setTimeout() call is only needed if the component was not on screen before the toggle call.
3. Page Titles
Angular comes with a class to help you manage your page title. I hooked into the route definition so that it was automatically defined based on the route.
You can define the page title on the route, and then subscribe to navigation change events through the router.
Since routes can be nested, we must recursively iterate over the routes to find the title. Once we have it we can use Angular’s TitleService to set the correct title.
Testing
Now that you know a few tips and tricks to help make your Angular app more accessible, you need to know how to test them.
WAVE
The first and easiest method to use is the WAVE browser extension.
WAVE Chrome Extension
WAVE Firefox Extension
You can locally evaluate each page using this extension to quickly find points of failure and remediate them. You will not find all the issues with your application using this method but it will get you started.
Axe
Axe also has free browser extensions to get you started with initial accessibility assessments.
Axe Chrome Extension
Axe Firefox Extension
Keyboard Testing
The next method is to test your application using your keyboard only. WebAIM has an awesome article to help get you started with this technique. If you cannot effectively use your app without a mouse, it’s not accessible! Make sure you use proper focus management and indicators to help improve keyboard navigation.
Screen Reader Testing
The final method I will recommend is screen reader testing. Again, WebAIM has great resources for helping you with this. Once you’re familiar with how the screen reader works, turn off your monitor and try to use your application. You will quickly find which areas need work.
Windows
Windows users can use NVDA and Firefox, Chrome, or IE with very little setup.
Mac
Mac has VoiceOver already installed and ready to go.
Linux
If you are a Linux user like myself, there are a few options available to you.
Chromevox
Link to Chromevox in the Google app store. I don’t recommend this option as there seem to be a lot of issues with ChromeVox and it doesn’t have very high adoption as of now.
Linux screen reader such as Orca
I haven’t tested any of these out yet but they are on my list to check out.
NVDA using VirtualBox
Finally, the method I use employs a Windows VirtualBox image running Firefox, Chrome, and NVDA. I will briefly walk you through setting this up as there are a few gotchas.
- Head over to https://developer.microsoft.com/en-us/microsoft-edge/tools/vms/ and get a Windows 10 image by selecting the “MSEdge on Win10” machine on the VirtualBox platform.
- If you don’t already have VirtualBox, go to https://www.virtualbox.org/ and download the appropriate package for your machine and install it.
- Once your image has finished downloading and you have VirtualBox installed, extract the windows image .zip and import the .ova into VirtualBox by double clicking on it and boot it up.
- If your Angular app talks to an external API that is hosted locally, be sure to add the appropriate hostfile entries in C:\Windows\System32\drivers\etc\hosts
- If you’re using the Angular CLI, make sure you add a host option onto your ng serve command so that VirtualBox can talk to it. Either your internal host IP or 0.0.0.0 will work.
- You may not need to do anything else other than install NVDA and Firefox but if your sound is disabled like mine was, go into the machine settings and find the “Audio” section.
You may have to play with the settings as I’m under the impression it is hardware specific, but here are the settings I had to use to get mine working correctly.

Host Audio Driver: PulseAudio
Audio Controller: Intel HD Audio
Enable Audio Output: Checked
Save and reboot your machine and you should be good to go! Take a snapshot once everything is setup so that you can always come back to this point if something breaks (or the 90 day Windows limit is reached).
Automated tests
Testing accessibility with front-end testing tools such as Jasmine and Karma is something I have yet to check out, but I really really like the idea. I think integrated accessibility checks into your test suite is a valuable practice and will protect against regressions. Here are a few resources if you’d like to dive into the topic.
Accessibility Testing with Angular
Automating accessibility testing with Selenium Webdrive and AxeCore
Test for accessibility and help millions of people
Conclusion
I’ve only scratched the surface of Web Accessibility in this post and there’s a ton I didn’t cover. I have included a small list of additional resources that are Angular-specific if you want to dive a bit deeper into the topic. Join the conversation on Twitter if you have any suggestions for additional topics to cover, if you have questions, or if you just want to say hi! Thanks for reading.
Resources
Angular 2 Training Book
Angular Accessibility Tips and Tricks
Accessibility with Angular
Angular CDK Accessibility
Tired of testing pages one at a time?
Pope Tech can get you up and running with usable web accessibility data in just a few minutes.
Email Newsletter
Want to receive emails with accessibility content similar to this article?
If you subscribe, we will email you web accessibility insights or things we learn a few times a month. You can unsubscribe at any time.