
Quick summary
All websites have web pages. These web pages have a page structure that includes navigation, an area for content, maybe a sidebar, and a footer.
Unfortunately, not every website has an accessible navigation and webpage structure.
An accessible webpage structure and navigation include using regions, a page title, a page language, navigation skip links, and labeling navigations when there’s more than one.
Rather watch the videos? Check out our YouTube structure and navigation playlist.
Learn more:
- Creating accessible navigations and sub-menus
- How to declare page language
- Check out all of our February Accessibility Focus: Structure and Navigation resources
What is a page structure?
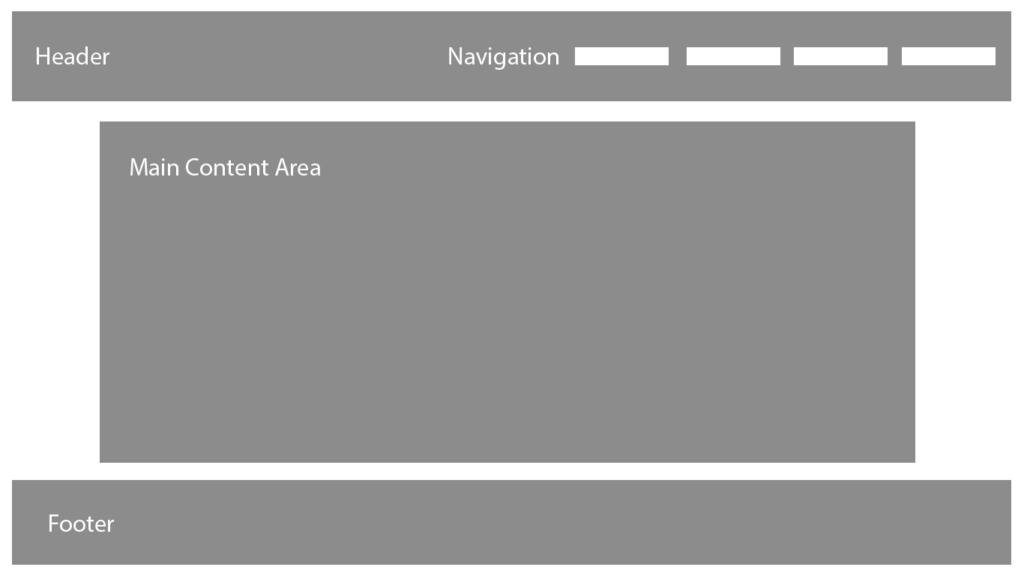
The easiest way to understand page structure is by thinking about the parts that make up your website’s template. Your template is what stays the same on each page.
For example on this blog, there’s a header with a navigation menu, a main content area where the article is, and a footer with links. Whenever I create a new page on this blog, there’ll be a header with the navigation, main content area, and footer. This is the page structure for this blog.
Page Regions/Landmarks
A web page’s structure should be made using regions/landmarks in the page’s HTML. Often times though, these aren’t included in the page’s HTML.
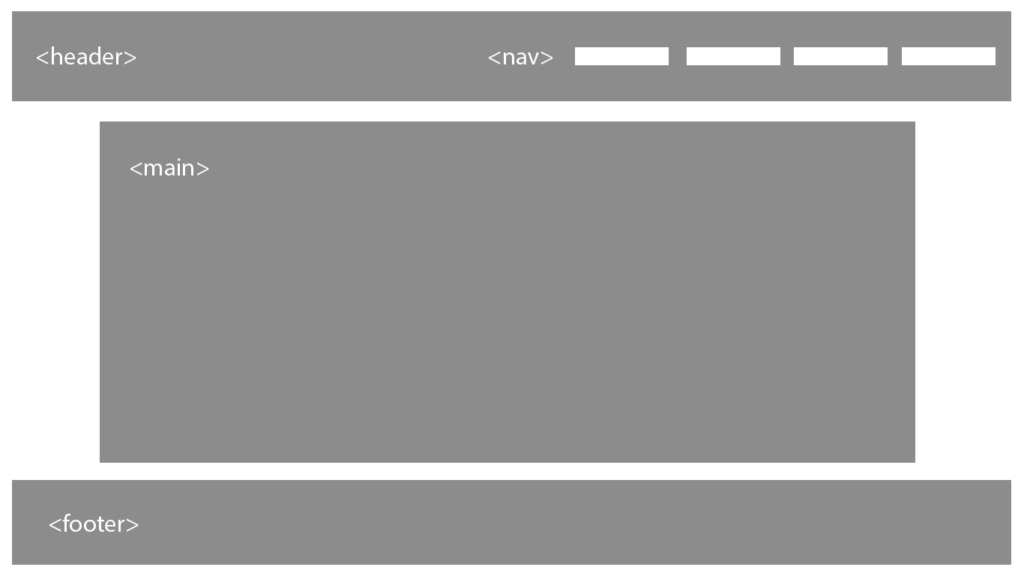
Regions/landmarks identify, or label, the different parts of the page structure. This can be done with HTML5 regions or ARIA role landmarks. Assistive technology users can then use them to navigate a page, which we demo below.
As an example, this page has the following HTML5 regions:
<header><nav><main><footer>
If we used an ARIA role landmark for the main content area, it could be coded like this:
<div id="main" role="main">
...
</div>
Page <head>
There’s one other part to each page’s structure – it’s the page <head>. It holds information about the webpage like the title, page’s language, keywords, and links to CSS style sheets.
The only part of a page’s <head> visual users will see or screen readers will hear is the page title. Users see or hear the page title in the browser’s tab.

Accessible page structure tips and examples
There are three accessibility strategies you can apply to your page’s structure.
They are:
- Use regions/landmarks
- Make sure each page has a page title
- Identify the page’s language
Use regions/landmarks
Like we mentioned above, HTML5 regions and ARIA landmarks identify page areas like the header, navigation, main content area, asides, or footer.
Why regions/landmarks matter
Identifying a page’s different parts matters because assistive technology can announce them and even navigate using them. This helps the user understand how the page is organized and navigate to where they want to go.
For example, if they want to go straight to the footer to look for a contact link, their screen reader can skip straight there as long as the page has regions/landmarks declared.
Watch What are HTML5 regions and why they matter for accessibility (YouTube video) to see how a screen reader uses regions to navigate.
How to declare regions and landmarks
Before adding regions or landmarks to your website, first, take a look at its design and list the different parts that make up your web pages. This will make it easier to know which HTML5 or ARIA landmarks you’ll use. For example, your website probably has at least a header or top bar where the logo is, navigation, main content area, and footer – it might also have sidebars or multiple navigations.
Once you know what parts of your website to identify, it’s just a matter of wrapping them with either the HTML5 region element or ARIA landmark attribute. Classes and ids can also be added to apply the styling to these different parts.
To learn more, visit W3C’s Page Regions.
Each page has a page title
As we mentioned above, the page title is in the <head> of the HTML.
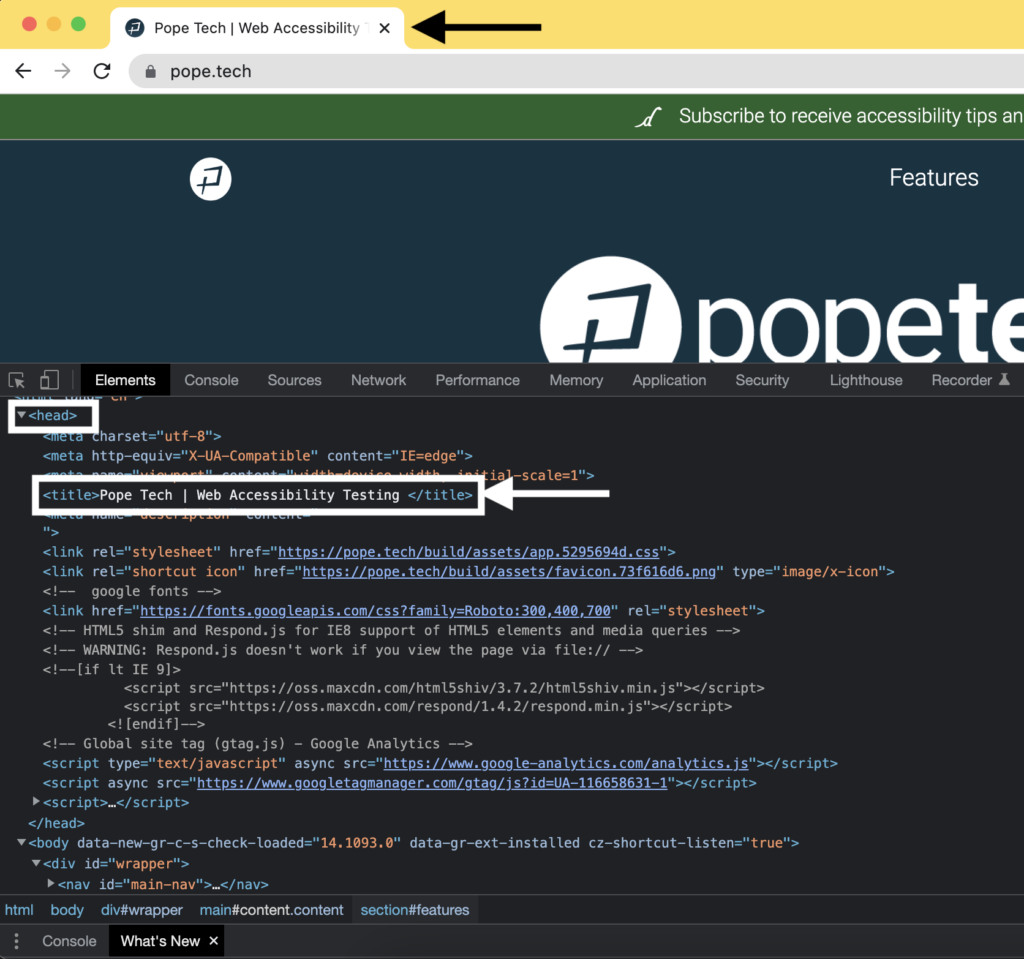
In the screenshot below, there’s the HTML for the Pope Tech homepage. At the top is the <head> tag and inside the <head> tag is the <title> tag. This title also displays in the browser tab.
Why does the page title matter
Visual users can read the title to understand the page’s purpose especially when there are multiple open tabs.

Screen reader and other assistive technology users also use the page title to navigate multiple open windows. A screen reader will announce the page title so the user knows what page they’re on, and a voice recognition user might say the page title aloud to select it.
If there isn’t a page title, or the page title isn’t descriptive, a screen reader user could hear something unhelpful and have to navigate through the page to know the content.
For example, the last tab in the screenshot below doesn’t have a page title, so it’s just the page’s URL, which could be confusing to hear. A voice recognition user could also have issues saying the URL to select it.

Watch a screen reader announce pages with and without titles in the video Page title screen reader demo (YouTube video).
How to add and write a page title
You’ll either use HTML or your CMS to add a page title. When using HTML, you’ll add the title in the <head>, so it looks something like this:
<head>
<title>Page title</title>
</head>
If you use a CMS, like WordPress or OU Campus, the page title is automatically set to be the same as the page’s title field, which might also show as the H1 on your page.
Some guidelines to consider when writing page titles are:
- The page title is descriptive but succinct.
- The text that identifies the page content should be at the beginning of the title, so it’s visible in the browser tab.
- The page title makes sense when read out of context. For example by a screen reader, in a site map, or in a list of search results.
- A page title is read each time a screen reader goes to a new page, so it should be short.
Here’s an example: the page title Admissions for a university’s application webpage might be concise, but it doesn’t make sense out of context. It could be the admission’s contact page or the home page. A better page title would be Apply to University.
Identify the page’s language
The page’s language is the language the page’s content is in. For example, this page is in English, so there is HTML that says this page is written in English. It looks like this:
lang="en-US"Why does the page language matter
The page’s language matters for several reasons.
First, some screen readers can change their pronunciation based on the text’s language. If the language tag doesn’t match the language the content is in, the text can become difficult or even impossible to understand. Here’s an example of a screen reader pronouncing Spanish content incorrectly and correctly.
The next reason is the page’s language can help with the automated translation of content with tools like Google Translate.
Lastly, the browser will present content differently based on the language. For example:
- Displaying the right characters for non-Latin text
- Using the right date and time inputs based on the language’s standard (such as using MM/DD/YYYY vs DD/MM/YYYY or 24-hour time vs. AM/PM time)
- Using a comma vs period as a number separator
- Spellchecking based on that language
How to declare the page’s language
Before you can declare the language in the HTML, you’ll need your language’s HTML code. Once you have the language code, put the lang attribute inside the <html> tag when starting your HTML document. If your language was French, it would look like this:
<html lang="fr">
...
</html>
For most websites, this is something you’ll do once in the website’s template. Then, the language will be there every time you add a new page.
How to declare a different language in the content
If you have text on the page that’s a different language than the page’s language, add the lang attribute to another element surrounding the content, so it’s read correctly.
For example, the page’s content is in English, but it mentions a book title that is in French, so a lang attribute is added to a <span> element. Now, the book title is read in the correct language.
<p>The title is <span lang="fr">Le Bon Usage</span>.Accessible navigation tips and examples
Your navigation is an important part of your page’s structure. It’s how users tell what content is on your website and then get to where they want to go.
There are three navigation accessibility strategies you should apply to your navigations, so everyone can use them:
- Use skip links
- Label navigations when there’s more than one
- Make sure there are multiple ways to navigate your website
Use skip links
Skip links are hidden links typically above a navigation that takes a user straight to the main content of the page. While they are usually used to skip navigations, they can be applied anywhere that would be tedious to tab through.
To see the skip link on this page, select your address bar and then select tab until you see the skip link. It’ll only appear when someone activates it by tabbing to it.

Why skip links matter
Imagine having to tab through a navigation every time you got to a new page. This would be a tedious experience, especially on websites with large navigation menus. That’s why skip links are so important – they are an easy way to improve a keyboard user’s navigation experience.
In What a skip-to-content link is and why they matter for accessibility (YouTube video), we demo how skip links impact keyboard users and other places to use skip links.
How to code a skip link
Adding a skip link to your website’s template just takes HTML and some CSS to hide it until it’s tabbed to. To learn how to create a hidden skip link, visit CSS Trick’s How to Create a “Skip to Content” Link.
Label navigations when there’s more than one
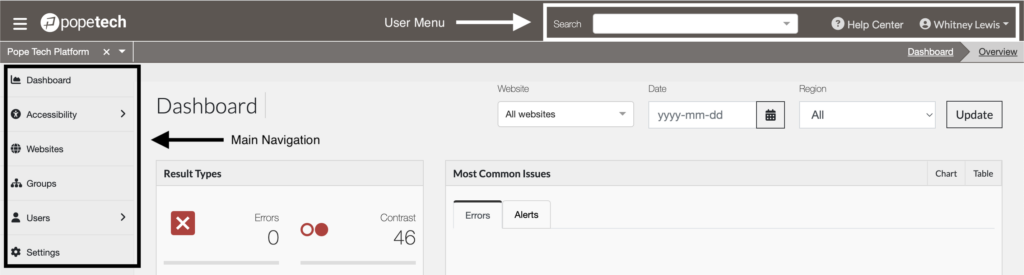
Websites with multiple navigations should label each navigation. For example in the Pope Tech’s accessibility platform, there are two navigations. The first is in the top right and the second is on the left. The top right navigation is labeled “User Menu” and the left navigation is labeled “Main Menu.”
Why labeling multiple navigations matters
If there are two navigations that both have the <nav> region, a screen reader would announce something like “navigation.” When there are two, there needs to be more context about what each navigation’s purpose is.
Let’s go back to Pope Tech’s “User Menu” and “Main Menu” navigations from above. If a screen reader user was trying to adjust their profile, they know to choose the “User Menu” because that’s where their user settings will be. If the user wanted to navigate the platform, they know to choose the “Main Menu.” Without these names, they’d have to keyboard into the navigation each time to make sure they were in the right place.
How to label a navigation
You’ll label a navigation using the HTML attribute ARIA-label. This can be added to any HTML element to change its accessible name. ARIA-label overrides any other accessible name and will be what the screen reader announces.
Adding a label to a navigation could be coded like this:
<nav aria-label="Main Menu" id="left-sidebar" class="left-sidebar">
...
</nav>
Make sure there are multiple ways to navigate your website
A WCAG accessibility requirement is there are multiple ways to navigate your website. This could be with a navigation menu and a search bar, or a navigation menu and a sitemap.
The requirements are:
- They must be available on every page. Search bars are typically seen at the top of pages, and a sitemap could be linked in the footer of each page.
- They must link to every page. A navigation menu doesn’t need to link to every page directly inside the menu. The pages in the menu can link to other pages that aren’t in the navigation.
Why multiple ways to navigate matters
Users can choose the option that suits their needs when there’s more than one way to navigate a website. For example, it might be easier for a screen reader to navigate a sitemap, or list of pages, to get a sense of the website’s content.
Key takeaways
- A page structure is the main part of your website. For example, the header, navigation, main content area, and footer.
- HTML5 regions or ARIA role landmarks are used to label these parts of your website in the HTML.
- Your page’s
<head>is also part of the page structure and includes important information like the page title and language. - Three page structure accessibility best practices are:
- Use regions/landmarks
- Make sure each page has a page title
- Identify the page’s language
- Three navigation accessibility best practices are:
- Use skip links
- Label navigations when there’s more than one
- Make sure there are multiple ways to navigate your website
Make your website’s navigation and page structure accessible
Now that you know more about accessible page structure and navigation, you’re ready to apply it to your own website.
The best part about fixing most of these structure and navigation issues is they are one-time fixes in the website’s template. Once they’re fixed, every page using that template is fixed, which can mean 100s of accessibility issues are resolved depending on how many pages use that template.
Here are the errors and alerts to focus on:
 Language missing or invalid
 Broken skip link
 Missing or uninformative page title
 No page regions
Follow these steps to find and fix structure and navigation issues on your website:
- Use the Pope Tech Platform or the free WAVE extension tool to find the issues listed above.
- Pope Tech Platform – From your Dashboard, drill down to the issues listed above.
- WAVE extension tool (free) – Test four pages on a website or course you contribute to.
- Fix or document the errors.
- Make an achievable goal of when the issues will be fixed and share that goal with your team or office.
- BONUS: If you don’t have one already, schedule a monthly accessibility check-in (even if it’s just you) to celebrate progress and remove blockers.
Learn more:
- Creating accessible navigations and sub-menus
- How to declare page language
- Check out all of our February Accessibility Focus: Structure and Navigation resources