Quick summary
Manual and automated accessibility testing work together to find accessibility issues.
Automated testing is good at finding programmatically detectable issues on lots of web pages. Fixing problems automated testing finds means fewer issues when you do manual testing. But, it can’t find every issue, which is why we need manual testing too.
Different types of manual testing are keyboard, screen reader, and zoom testing.
It can seem intimidating, but once you know manual testing basics, it becomes quicker and easier.
Visit March Accessibility Focus: Screen reader, keyboard, and zoom testing for more resources, or check out these articles:
Why manual testing matters
Manual accessibility testing is necessary for an accurate and effective accessibility strategy. Oftentimes, automated testing tools can help you manually test.
Below are two examples. The first is when automated testing would help with manual testing. The next example is when only manual testing would find the issue.
Example 1: Alternative text
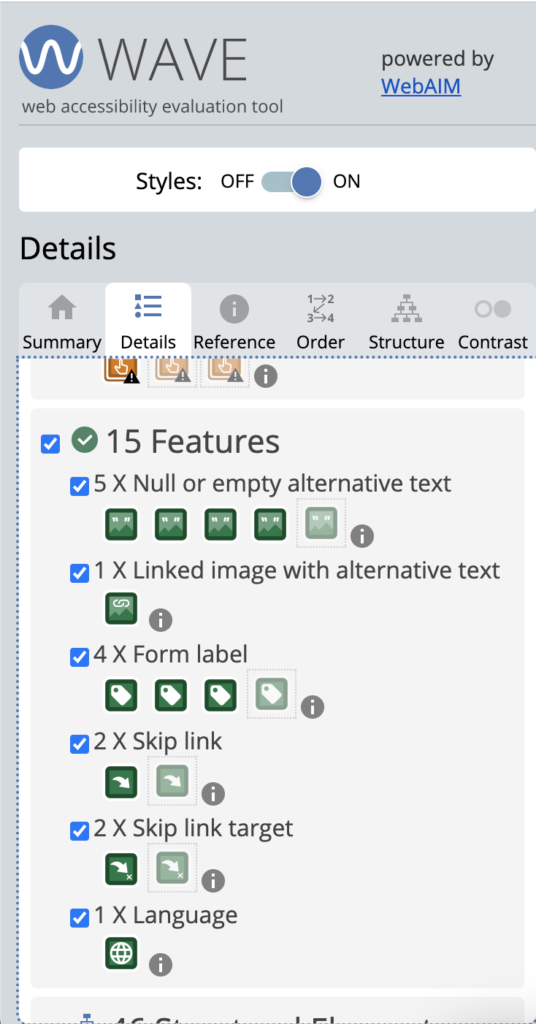
An automated testing tool can check if an image has an alt attribute. It can’t determine if the image should have alternative text or if it’s written well. So, you can use an automated testing tool like WAVE to find all images and then check the alternative text.
For example, we have an image of the WAVE testing tool. The image has an empty alt attribute like this:
<img src="/wavetool.png" alt="">
Programmatically, this is right. But, the empty alt attribute tells screen readers that the image should be skipped over because it’s just decorative.
In this case, the image isn’t just decorative. It’s conveying information in the WAVE tool, so the alternative text shouldn’t be empty. Instead, it should be something like Accessibility Features in the WAVE accessibility testing tool. The HTML code would look something like this:
<img src="/wavetool.png" alt="Accessibility Features in the WAVE automated testing tool">An automated testing tool wouldn’t catch that the image needed alternative text on its own. It would only be caught with manual testing that could be assisted with an automated tool.
Example 2: Forms and focus indicators
Form error messages and focus indicators are an instance when the issues would only be caught with manual testing.
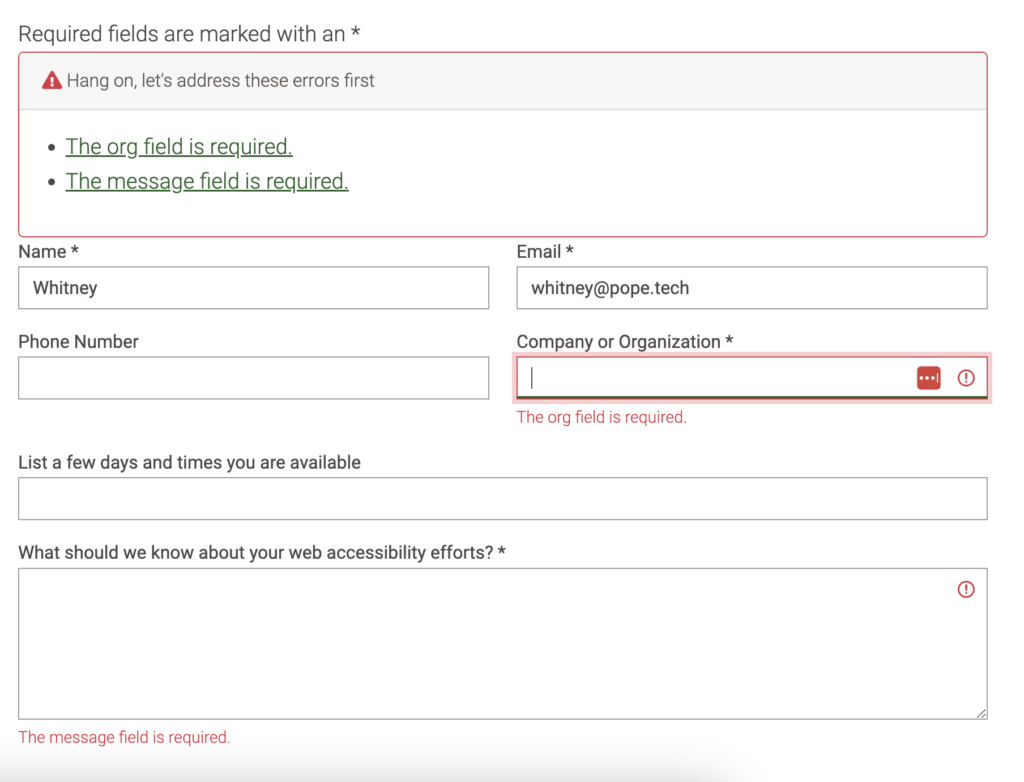
A form should read any associated error messages when the focus is on the field. For example in the screenshot below, the screen reader should announce “The org field is required” because the focus is on that field. There should also be a focus indicator on every focusable element, which includes form fields and links.


This is why manual testing is an important part of any accessibility strategy. While automated testing finds programmatically detectable issues and helps with some manual testing, manual testing finds issues that automated testing doesn’t cover.
Prepare for manual testing
Before starting manual testing, consider asking yourself these questions:
- How often should I manually test?
- How many pages should I manually test?
- How will I track issues and questions while manually testing?
Let’s go over each of these questions.
How often should I manually test?
How often you manually test your website depends on how often it changes. Ideally, manual testing is part of your update process. So, when the website is updated with impactful changes, those changes are manually tested.
In addition to manually testing whenever there are impactful changes, we suggest doing a comprehensive manual test annually.
How many pages should I manually test?
You could manually test every page on your website, but we know that the time and resources might not be available to do that. That’s where getting a page sample comes in.
When doing your yearly manual test, you can test a selection of pages. We suggest one of two ways to select pages.
The first is to select pages based on your top goals for your website and then test those flows. For example, applying to a university or completing checkout.
The second is to build your sample with at least these four pages.
- Homepage
- Prominent content page
- Prominent page with form
- Random page
Testing a selection of pages will find issues embedded in your website’s template. Resolving these issues will fix them on every page that uses that template, which can have a large impact on your website’s accessibility.
You’ll also find issues that you know might be on other pages. For example, if a form isn’t accessible and you have other forms, you’ll know you should check those as well.
For more information on starting a manual audit and getting your sample, check out Use the WAVE extension to start accessibility audits. Just remember, an automated tool like WAVE can help start a manual audit, but you’d still need to do screen reader, keyboard, and zoom testing to complete the manual testing.
How should I track issues and questions while manually testing?
The last thing you need to do before manually testing your website is to get a method for documenting issues or questions to investigate further.
If your team already uses project management software to track development tasks, we suggest adding issues there. Then, they can be prioritized along with other work.
Some information to include in each issue:
- URL of webpage
- Description of the issue
- Screenshot or screen recording
- HTML code of the issue if applicable
- If it’s a template issue (these should be prioritized first since they have a large impact)
- If it needs further investigation or if it’s ready to be fixed now
Here is a manual accessibility testing log Excel tracker for download.
How to keyboard test
You can practice keyboard testing right now by using the keystrokes below.
The keys you’ll use when navigating a webpage with a keyboard are:
| Keystroke | Action |
|---|---|
| Tab | Navigate down the page using interactive elements (links, buttons, form fields) |
| Shift + Tab | Navigate up the page using interactive elements (links, buttons, form fields) |
| Enter |
|
| Spacebar |
|
| Up, down, right, and left arrows |
|
| Escape (Esc) | Close modal-dialog |
Things to check for when keyboard testing
Here are the main things to focus on while keyboard testing. For more, read WebAIM’s keyboard accessibility.
- Every interactive element you tab to has a focus indicator. A focus indicator is a visual indicator that shows a keyboard user where they are on the page. Elements that aren’t interactive should not have a focus indicator.
- There’s a logical navigation order when tabbing through the page. A keyboard user should be able to tab through the page following the visual flow of the page. For example, left to right and top to bottom.
- Custom widgets are keyboard accessible. Custom widgets made with JavaScript should be accessible with a mouse and keyboard.
- Navigation has a skip-to-content link. This is probably hidden visually until you tab to it.
- Forms can be completed using only a keyboard.
Learn how to keyboard test and what issues to check for in this video:
How to screen reader test
The key to screen reader testing is to get comfortable accessing and using a screen reader. The only way to get comfortable is to start using it. The more you test, the quicker and easier it’ll become.
To get started with screen reader testing, follow these steps:
- Access a screen reader. Both Mac and Windows have free options that we suggest starting with. Check out WebAIM’s Mac’s VoiceOver screen reader or WebAIM’s NVDA for Windows to learn how to use these free options. Pay special attention to the Getting Started section in these articles to make sure you configure the screen reader correctly.
- Open the page you want to test in the most used browser for that screen reader. For VoiceOver, test the page in Safari. For NVDA, test the page in Chrome.
- Turn your screen reader on and go through the page using the screen reader keyboard shortcuts.
Even though there are other screen readers and screen reader/browser combinations you could test, starting with what’s available to you in the most common browser for that screen reader will typically find the critical issues.
Keyboard shortcuts
Here are keyboard shortcuts for VoiceOver and NVDA. To see them in action, watch the videos below.
VoiceOver shortcuts
| Action | Keystroke |
|---|---|
| Turn on |
|
| VO modifiers |
|
| Navigate headings |
|
| Rotor | Caps Lock (VO) + U |
| Navigate interactive elements |
|
| Read content |
|
| Navigate groups |
|
NVDA shortcuts
| Action | Keystroke |
|---|---|
| Turn NVDA off | Insert or Caps Lock + Q |
| Turn NVDA on | Control + Alt + N |
| NVDA Settings | Insert or Caps Lock + N |
| Navigate headings |
|
| Navigate line-by-line | Up and down arrow keys |
| Navigate interactive elements |
|
| Read content |
|
| Elements list | Caps Lock or Insert + F7 |
Things to check for when screen reader testing
If you start your manual audit with an automated tool, you’ll find a lot of issues that would affect a screen reader user before even doing your screen reader testing. That means when you do your screen reader testing, you can focus on things automated tools can’t find such as:
- All focusable elements are announced correctly. Tab through the page to check each focusable element.
- Dynamic content is accessible. If your website has dynamic content (content that changes based on a user’s input or information), are all dynamic changes and updates accessible?
- Form instructions and error feedback are announced correctly. Form instructions and error feedback should be announced when the user is focused on the field.
- Custom widgets are navigable and announced correctly. Custom widgets often require ARIA to be accessible. Checking with a screen reader makes sure everything is working properly.
Learn how to get started with either VoiceOver or NVDA in the videos below:
How to zoom test
Zoom testing is when you increase the size of your screen to make sure the content is still readable. Here are the zoom tests to do to make sure your content meets accessibility requirements:
- Zoom in to 200%. Use Control/Command and +/- to zoom in and out.
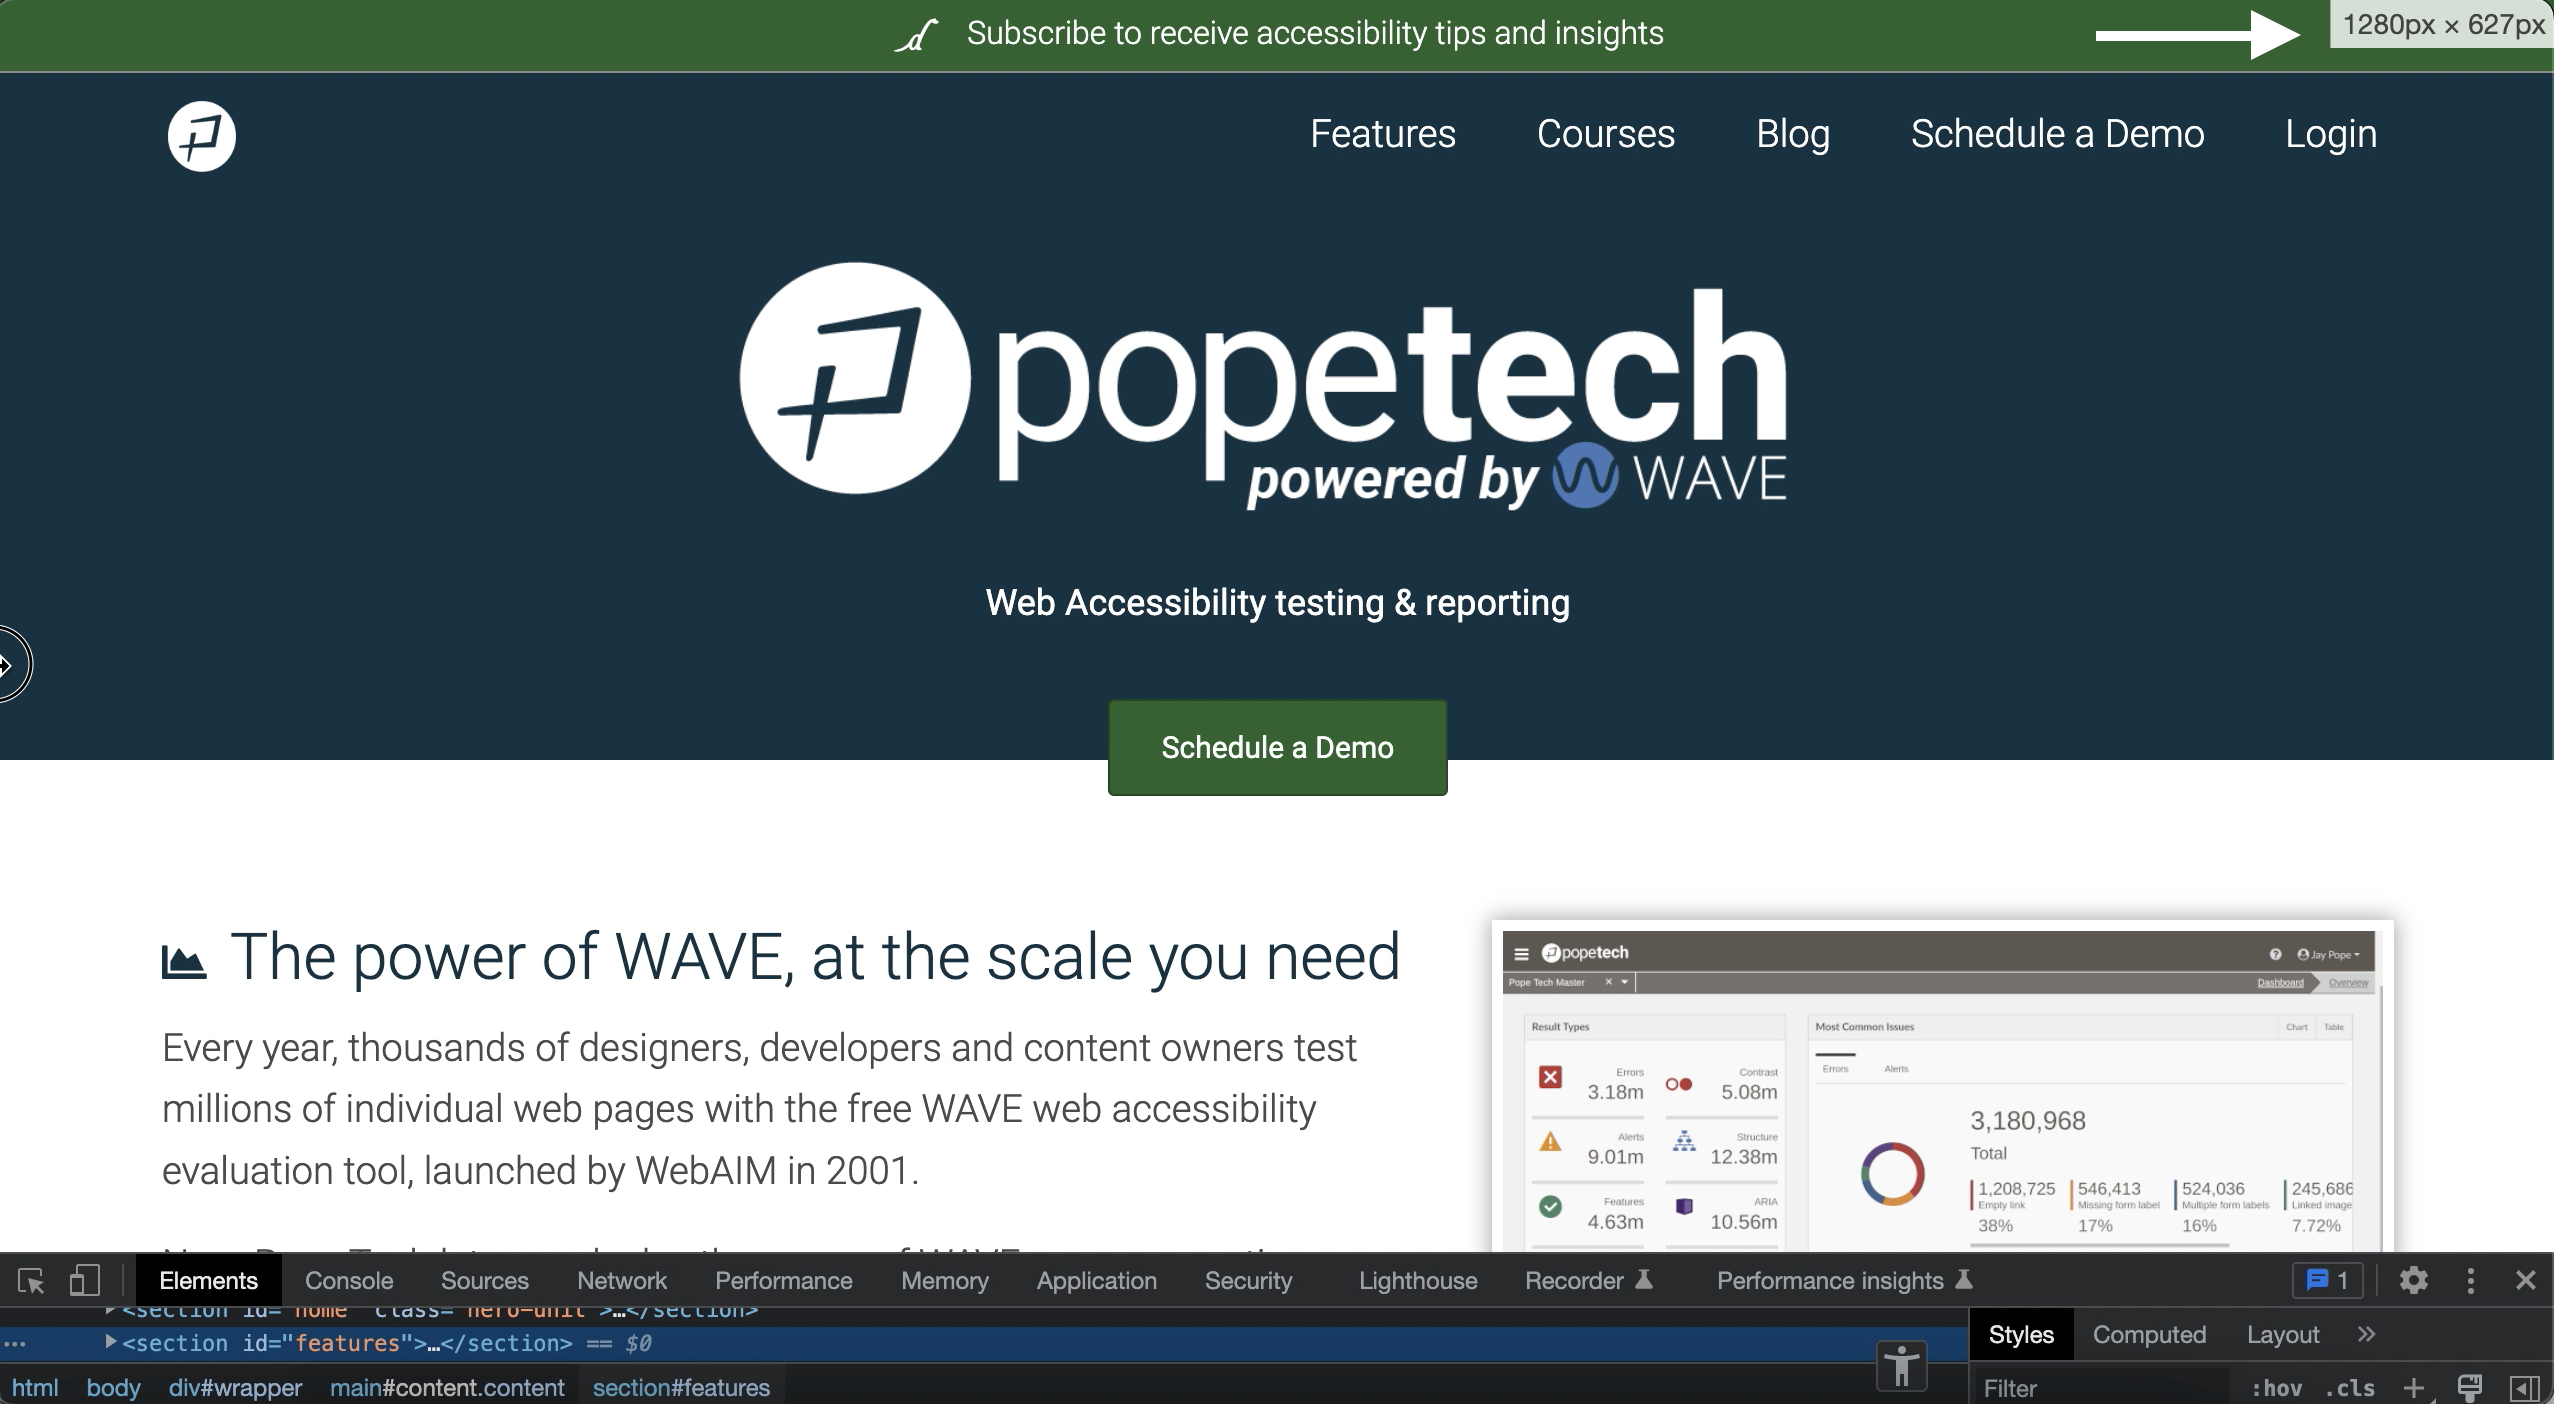
- Adjust the viewport to 1280 pixels wide and zoom to 400%. You can measure your viewport in Chrome by right-clicking on the webpage and selecting Inspect. From there, adjust your window’s size and you’ll see the viewport width in the top right.

- Test text-only zoom. In Firefox, select View > Zoom > Zoom Text Only and zoom to 150%.
PRO TIP: If you’re designing a website to be responsive at 320px then it should work properly in both these zoom tests.
Things to check for when zoom testing
Here are the main things to look out for while zoom testing:
- Avoid overlapping content. All content should still be readable.
- Avoid horizontal scrolling. Some content, like data tables or maps, might require horizontal scrolling.
In this video, learn how to zoom and what issues to check for:
Key takeaways
- Automated and manual accessibility testing work together to find accessibility issues. While automated testing can help start manual audits, it can’t find every accessibility issue. That’s why we need to manually test too.
- Manual accessibility testing means going through your website with assistive technology, a keyboard, and zooming to make sure it’s accessible.
- Both Mac and Windows have free screen reader options that we suggest starting with. Check out WebAIM’s Mac’s VoiceOver screen reader or WebAIM’s NVDA for Windows to learn how to use these free options.
- Document these issues when screen reader testing:
- Focusable elements isn’t announced correctly.
- Dynamic content isn’t announced correctly.
- Form instructions and error feedback aren’t announced correctly.
- Document these issues when keyboard testing:
- Interactive elements don’t have a focus indicator.
- The navigation order isn’t logical.
- Custom widgets aren’t navigable with a keyboard.
- Navigation doesn’t have a working skip-to-content link.
- Form can’t be completed with only a keyboard.
- Make sure your content is readable while doing these zoom tests:
- Zoom in to 200%. Use Control/Command and +/- to zoom in and out.
- Adjust the viewport to 1280 pixels wide and zoom to 400%. Watch the video below for a demo.
- Test text-only zoom. In Firefox, select View > Zoom > Zoom Text Only and zoom to 150%.
- Document these issues when zoom testing:
- Overlapping, unreadable content.
- Horizontal scrolling.
Add manual testing to your processes
Like we mentioned above, manual accessibility testing should be done whenever there is an impactful change and at least anually. Consider these questions to prepare your team or organization to incorporate manual testing into your processes.
- Who’s responsible for manually testing major website/software updates before they’re launched? Who is responsible for the annual accessibility test?
- Does everyone who would be manually testing have the knowledge to do so? If not, send them Use the WAVE extension to start accessibility audits and embed accessibility into processes and this article.
- How and where will accessibility issues be logged and tracked?
- If you use project management software, how can manual accessibility testing tasks always be included in major website update projects? If you don’t use project management software, would a checklist be helpful as people get used to these new tasks?
- When will the annual manual test happen?
